Home DIY Projects
The Outdoors
OpenSprinkler Pi
When I first bought my home, it had a sprinkler system installed. It had one of the worst hardware controllers I've ever seen. It was very complicated, and there were no instructions to speak of. My goal was to find something better. I started looking, and fortunately found the OpenSprinkler project that also included an option to use a Raspberry Pi board with their hardware controller.
The interface was a very clean, simple, and yet powerful open source web page, and this was exactly what I was looking for.
I made a video on the topic early in my YouTube channels existence, but now I'm selling my home. While this setup has been perfect for me, a fairly tech-savvy person, I'm concerned that the new owners, much less the inspector, won't be able to operate, or figure out how to connect to the device.
New project time! After talking about this with my wife, I started working on a plan. See, the way I had the system setup, was I connected a Raspberry Pi 3 to the controller, and used the built in Wifi of the Raspberry Pi to access the web control interface from my phone or any computer on my network. This, however would require a new owner to know how to connect to the device, change their network settings to match their network information, and so on. Just a heap of issues waiting to happen essentially.
The good news is that I setup the Pi using the Reaspbaerry Pi OS Desktop version, which meant I did have a Desktop to start with. Whew!
Next, I needed a way to make it so the new owners (or an inspector) could easily interact with the controller(s) without having to do any special network setup.
I could used a cheap usb mouse, keyboard, and monitor, but what a clunky setup. Nope, this is the day of touch-screens. And fortunately they are fairly inexpensive to get.
A quick search on Amazon, and I had the screen I needed. Now to setup the Pis, Controllers, and Touch Screen in a way that makes running the sprinklers as easy as possible.
Parts You'll Need
- Reaspberry Pi Model 3B is ideal. https://www.amazon.com/Raspberry-Pi-MS-004-00000024-Model-Board/dp/B01LPLPBS8
- Micro SD Card - https://www.amazon.com/Amazon-Basics-microSDXC-Memory-Adapter/dp/B08TJRVWV1/ref=sr_1_3?crid=26PTDH1KBQRD0&keywords=micro+SD+Card&qid=1707679634&s=electronics&sprefix=micro+sd+card%2Celectronics%2C281&sr=1-3
- OpenSprinkler Pi Controller Board - https://opensprinkler.com - Search Products for OSPI
- 24 Volt Power Supply - include this with your purchase at the link above.
- Touch Screen - https://www.amazon.com/dp/B0776VNW9C?psc=1&ref=ppx_yo2ov_dt_b_product_details
- About an hour of you time.
First, you need to get Raspberry Pi Desktop OS installed on an SD Card. I use Balena Etcher, but you can use any app you want for putting an image on an SD Card. You can download the Raspberry PI OS Desktop version here.
Once imaged, insert the SD card into your Raspberry PI and start it up. You'll need a keyboard, mouse, and monitor connected for this initial setup. But after that, you'll be able to control it remotely.
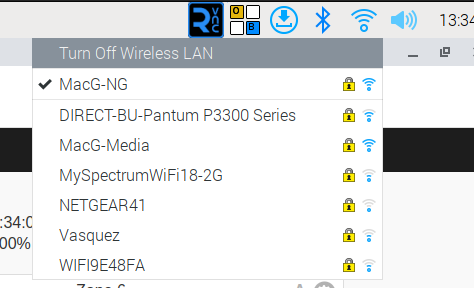
First, setup your network details such as WiFi SSID and Password, and make sure the Pi connects to your network.
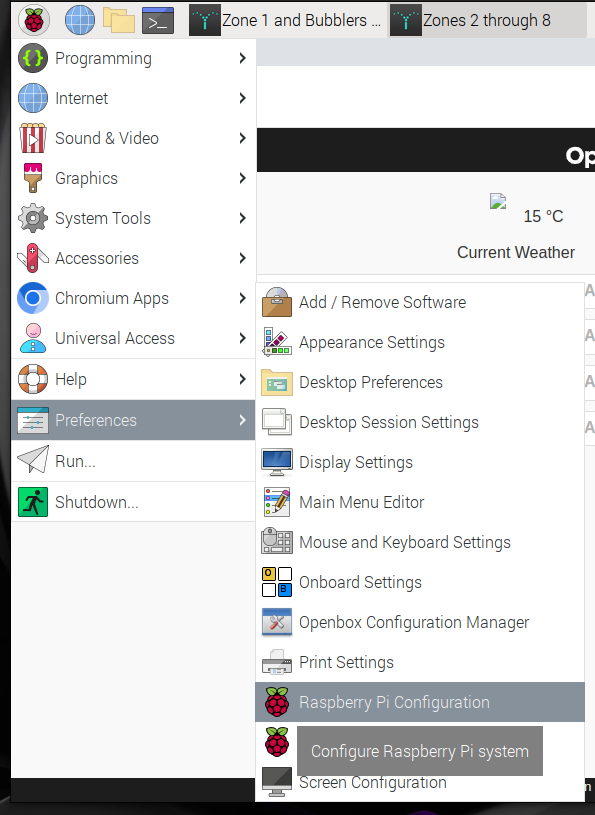
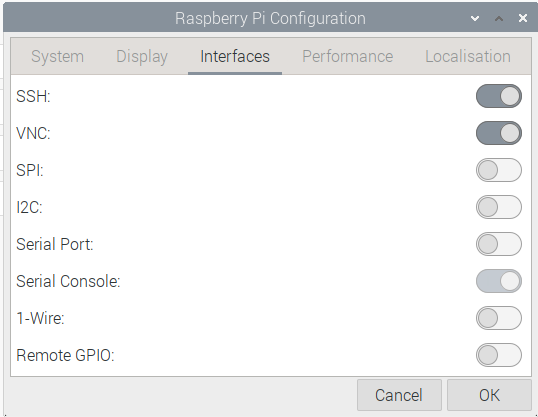
Next, go into the Raspi-Config from the left menu, and enable VNC and SSH in the interfaces section.
After setup, reboot the raspberry Pi. Note: you'll need a screen connected in order to reach the desktop environment, but if you only want to setup the OpenSprinkler Pi web server, it can all be done through SSH, which won't require a monitor.
Installing OpenSprinkler PI
From the Reaspberry PI (either through SSH, or by opening the terminal on the Pi) enter the following to pull down the
OpenSprinkler PI firmware. You'll want to have the OpenSprinkler board connected to the pi at this point.
sudo apt-get update
sudo apt-get install build-essential -y
cd
git clone https://github.com/OpenSprinkler/OpenSprinkler-Firmware.git
cd OpenSprinkler-Firmware
sudo ./build.sh ospi
Once complete, you'll have OSPI running as a web server on the device. Well done!
Setting up our System for Easy Access
In order to keep it as easy as possible for any new owner to use the system, particularly since I setup a touch-screen as the monitor, we need to do a few things.
- Setup our Web Page as a Desktop Shortcut
- Auto-open the application when the system starts
- Make it so our applications open with a single click / touch (instead of double clicking).
- Add an On-screen Keyboard to the system
The easiest way to create a desktop shortcut that will open our web page more like an installed application is to use Chromium. This has a function built right in to create a shortcut on the desktop as an application. Luckily Chromium is the default browser already on the Raspberry PI.
Open Chromium, and type in http://localhost:8080 . This will open your OpenSprinkler web application. If prompted to login, do so. The default password for OS Pi is "opendoor". I highly recommend you change this to something more secure.
Once logged in, click the t-dot icon in the upper right corner of Chromium. This will expand the menu. From there move down to the "More Tools" option, and then select "Create Shortcut" from the last sub-menu.

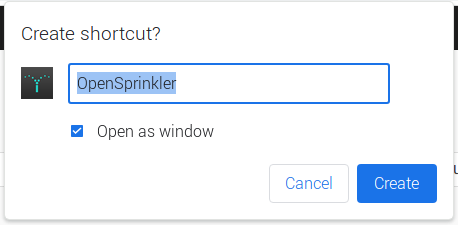
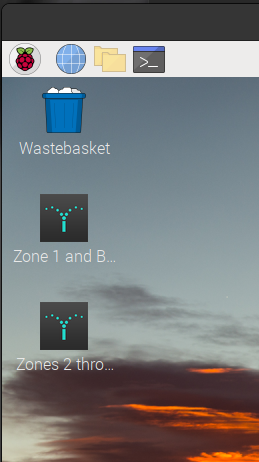
In the pop-up, name the shortcut (for instance, "OpenSprinkler", then check the box that says "Open as Window". Click "Create" and you'll see the icon appear on the desktop.
You can now close Chromium, and open the new shortcut. You'll notice all of the extra stuff around the edges, URL bar, Bookmarks bar, etc. are gone, and you are left with a much cleaner page.
You can right click the icon on the desktop and rename it to something else, if you prefer. In my case, I run 2 of these devices, so I renamed them according to the zones you control with each.
Now, this is all great, but let's make it so that application opens automatically when we reboot the system. This is intended to be an Appliance, so it only makes sense to have it open to the application we intend to use on it.
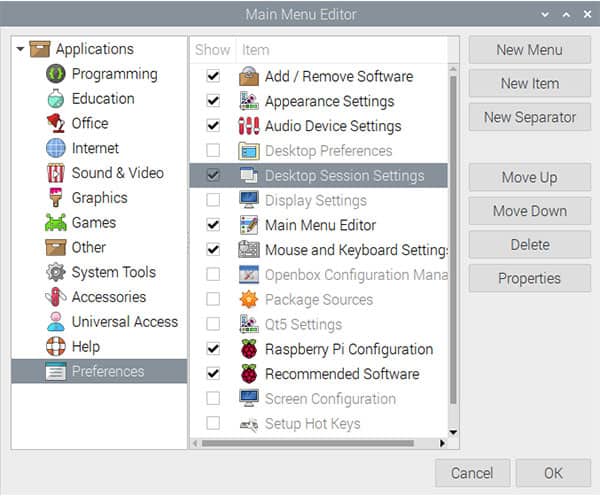
- Go in the Main Menu > Preferences > Main Menu Editor.
- Browse to Main Menu > Preferences, and check the “Desktop Session Settings” box: If it's already checked, leave it checked.
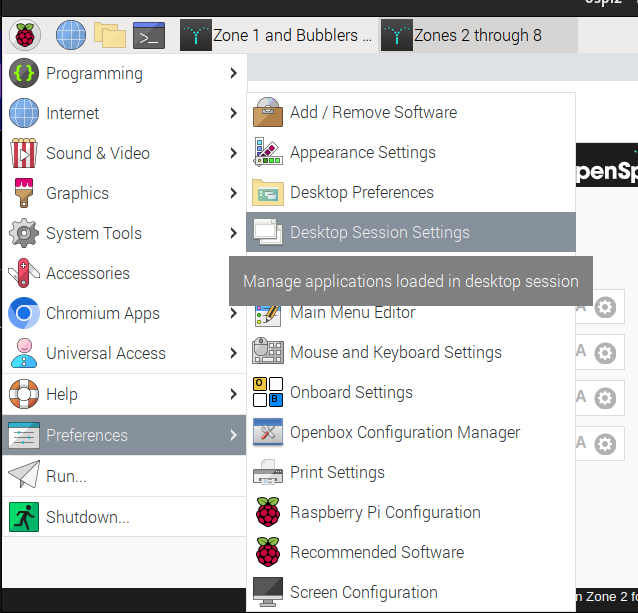
- Close this window and go back to Main Menu > Prefernces, then open Desktop Session Settings
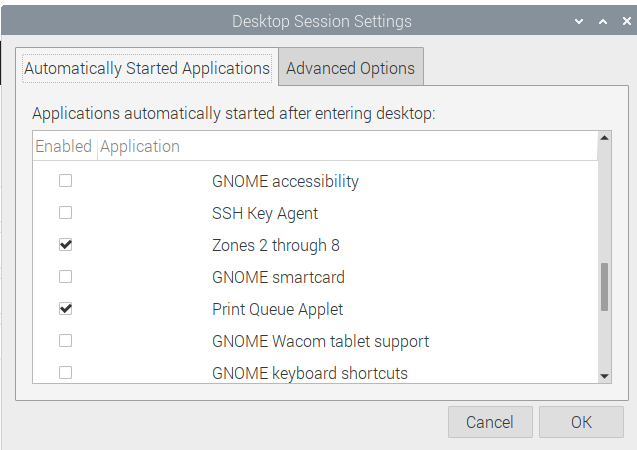
Now check the box to the left of any items you want to open on start up.
Open Our Application with a Single Click / Touch
In a File Manager window, click 'Edit', then scroll down to the option for 'Preferences' and select it.
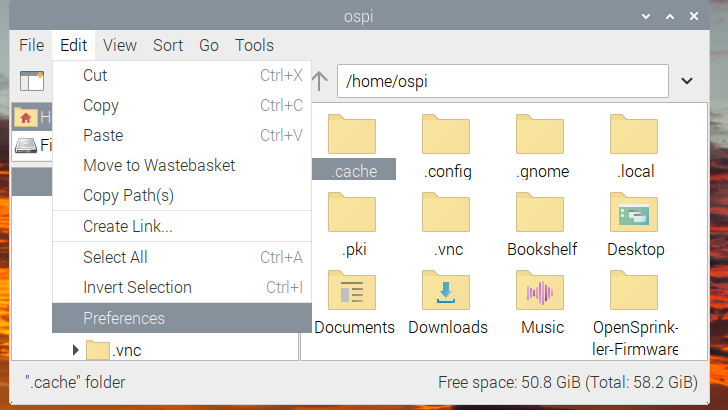
Once open, in the 'Behavior' section, at the top, tick the box for 'Open files with single-click'. Feel free to adjust the timing below the option to something appropriate so you don't accidentally open the twice with a double click. When done, click 'Close'.
Lastly, let's install an on-screen keyboard that we can call up when needed. For this, I selected 'Onboard', and open source on-screen keyboard that has a nice setup of preferences, as well as the ability to program 'quick actions', so you can setup longer commands with a single touch.
sudo apt update
sudo apt install onboard -y
Finally, we'll install once library that helps Onboard behave better on a Raspberry Pi system.
sudo apt install at-spi2-core
Let's reboot our Pi one more time.
sudo reboot
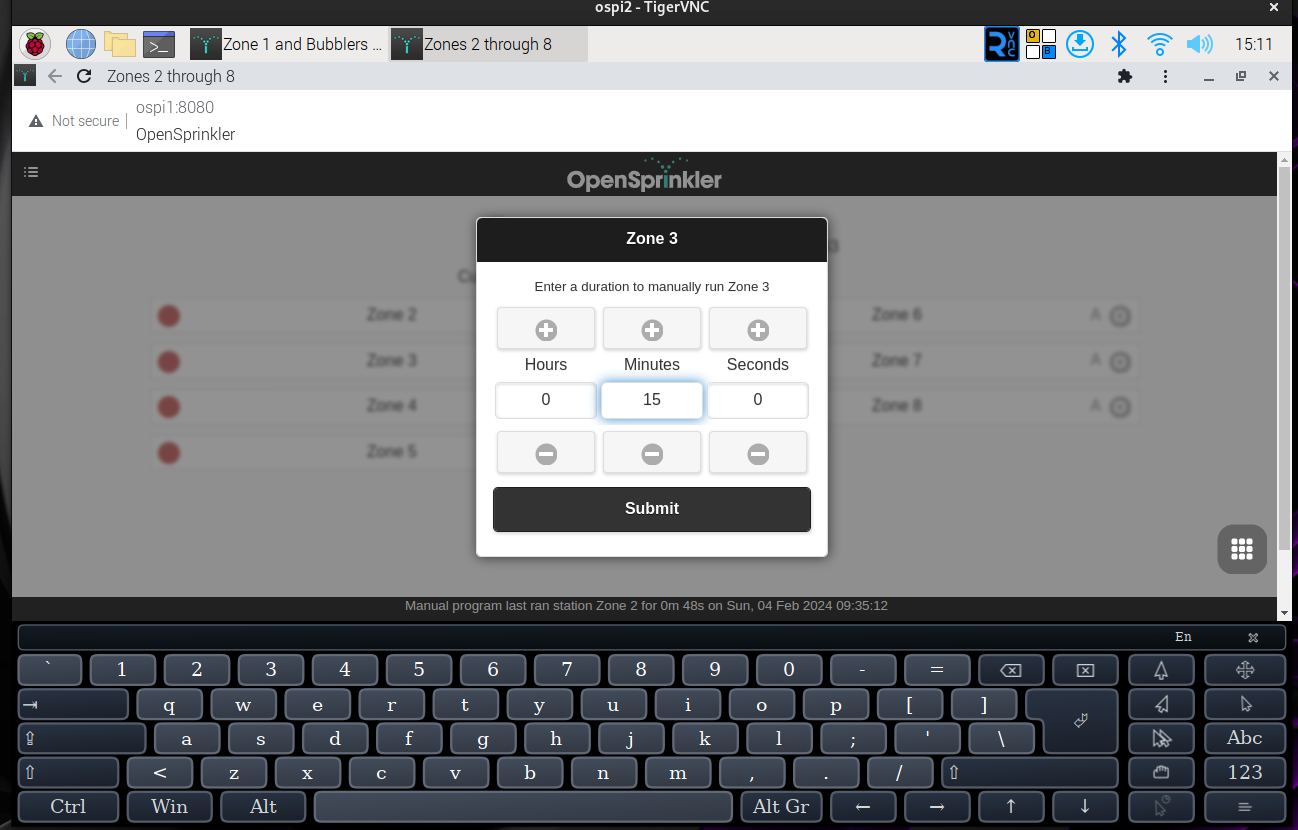
When it comes back up, click the menu icon in the upper left, then go down to Universal Access and select Onboard.
You'll likely see the keyboard pop-up at the top of the screen, but you can drag it by grabbing the key with the four-way arrow on it. Place Onboard where you want it, and resize it by grabbing the window edges. 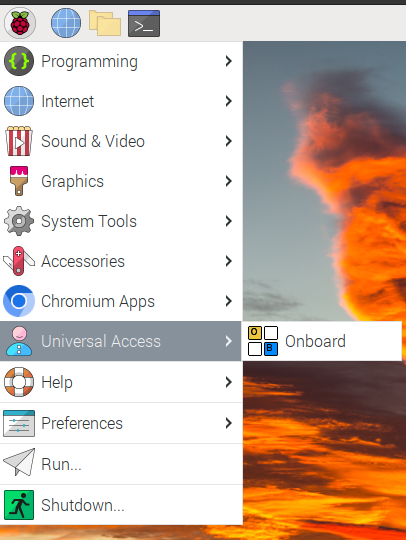
Congratulations! You now have a touchscreen capable, open source, powerfully awesome sprinkler controller for your home.
NOTE: You may want to go back and add Onboard as a startup application using the same method from above. If you don't find it in the list, just go to it in the main menu, then right click, and select 'Show on Desktop'.
My wife and I built a wooden mount for this system, and slotted the mount so the monitor would slide easily down into it and out of it as needed. This system is really way beyond what you'd get from an off the shelf sprinkler controller. Not to mention, you still have the option to hit the web server from your mobile device, and work on your sprinklers, test everything right there in front of it without having to go back and forth to the controller, or having to yell at someone else to turn things on and off.
I'm someone enterprising could build this out more cleanly and beautifully, with a nice 3D printed wall mount for around $ 400.00 US total, and then sell it for $400.00 US to plenty of people.
Hope you enjoyed this, and hope it helps you do something awesome with open source software and hardware.
Support My Channel and Content
Support my Channel and ongoing efforts through Patreon:
https://www.patreon.com/awesomeopensource
Holiday Light Shows
Light shows can be absolutely amazing, fun projects, which bring joy to everyone who sees them.
Halloween 2025
About the Show
Decorations
- Big Bat - Idea: George McGonagill / Build: George and Beatriz McGonagill
- HAPPY HALLOWEEN - Idea: Beatriz McGonagill / Build: Beatriz McGonagill
- Small Pumpkins - Idea: Sofia McGonagiall / Build: Beatriz and Sofia McGonagill
- Large Pumpkins - idea: Judy McGonagill / Build: Beatriz and George McGonagill
- Small Bats - Idea: Sofia McGonagill / Build: Beatriz and Sofia McGonagill
- Arches - Idea: Brian McGonagill / Build: Beatriz and Brian McGonagill
- Roof Line - Build: Brian McGonagill
- Tombstones and Crosses - Idea: Brian McGonagill / Build: George, Beatriz, and Brian McGonagill
Hardware Used
- Plywood (1/2 inch)
- Spray Paint
- Clear Coat
- Wood Screws of various sizes
- Stakes https://www.amazon.com/dp/B0D1JWHWNB?th=1 <-- not an affiliate link
- Falcon F16v3 Controller Board for Pixel Lighting - https://pixelcontroller.com/store/featured/88-f16v5.html <-- F16v5 (newer and better)
- Raspberry Pi 3b+
- 100s of feet of 3 wire cabling - https://www.amazon.com/dp/B07ZGFVH81 <-- not an affiliate link
- xConnect Pigtails - https://www.amazon.com/dp/B09CDQWTFG?th=1 <-- not an affiliate link
- xConnect Bullet Style Pixel Lights WS2811 12Volt - https://www.amazon.com/dp/B0CNXPYQF5 <-- not an affiliate link
- FM Transmitter - Basewish CZE-7C 6W FM Transmitter
Software Used
All software used is open source and freely available.
- xLights - https://xlights.org/
- Audacity - https://www.audacityteam.org/
- xLights Custom Model Builder - https://www.lightshowhub.com/tools/xlights-custom-model-builder
- GIMP - https://www.gimp.org/
- FPP - Falcon Pi Player - https://github.com/FalconChristmas/fpp
Music in this show:
- Ghostbusters (cover by Maytree) - https://www.youtube.com/watch?v=X_LIOPK8zFE
- This is Halloweed (cover by VoicePlay) - https://www.youtube.com/watch?v=YL44YFyNLys
- Thriller (cover by Ice Nine Kills) - https://www.youtube.com/watch?v=0ZvkwR7k1iE
Christmas 2025 Light Show
The Decorations
- Singing Bell - Built by Beatriz McGonagill, Painted by Beatriz and Sofia McGonagill
- 6 Candy Canes - Built by Beatriz McGonagill, Painted and Sparkled by Beatriz and Sofia McGonagill
- 6 Small Starts - Built by Beatriz McGonagill, Painted and Sparkled by Beatriz and Sofia McGonagill
- 12 Snow Flakes - Built by Beatriz McGonagill, Painted and Sparkled by Beatriz and Sofia McGonagill
- 2 Big Stars - Build by ArcRite Welding (Clay Taylor) - Idea George McGonagill and Judy McGonagill - Painted and lit by Beatriz and Sofia McGoangill
- 10 Ft Smart Light Tree - Built by Brian McGonagill
- Merry Christmas and Feliz Navidad signs - Built and Painted by Beatriz McGonagill
- Ornaments (Hope, Joy, Snoopy, Woodstock) - Built and Painted by Beatriz McGonagill and Sofia McGonagill - Idea - Sofia McGonagill
- Arches - Design and Build - Brian and Beatriz McGonagill
- Roof Line - Decorated by Brian McGonagill (Still haven't fallen off yet - whew!)
Total Smart Pixel Lights 4200 (so far)
The Music
- Jingle Bell Rock - Bobby Helmes - https://youtu.be/nIhs1T7OcZg?si=pwNyKJc7q_OZ3Euq
- Silver Bells - cover by Relient K - https://youtu.be/jASkYlYNU1I?si=3IfR8eoKtoP2zkFl
- Little Drummer Boy - Live - Calvary Orlando - https://youtu.be/B12lO-gv1c0?si=UQzGBDnQM8qnLYSQ
- Southern Kind of Christmas - Al Ingram - https://share.opensourceisawesome.com/s/ew68pptjgC
The Hardware
- Plywood (1/2 inch)
- Spray Paint
- Glitter
- Clear Coat
- Wood Screws of various sizes
- Stakes https://www.amazon.com/dp/B0D1JWHWNB?th=1 <-- not an affiliate link
- Falcon F16v3 Controller Board for Pixel Lighting - https://pixelcontroller.com/store/featured/88-f16v5.html <-- F16v5 (newer and better)
- Raspberry Pi 3b+
- 100s of feet of 3 wire cabling - https://www.amazon.com/dp/B07ZGFVH81 <-- not an affiliate link
- xConnect Pigtails - https://www.amazon.com/dp/B09CDQWTFG?th=1 <-- not an affiliate link
- more than 4200 xConnect Bullet Style Pixel Lights WS2811 12Volt - https://www.amazon.com/dp/B0CNXPYQF5 <-- not an affiliate link
- FM Transmitter - Basewish CZE-7C 6W FM Transmitter
- Meanwell 12V / 60 A (300 W) power supply
The Software
- xLights - https://xlights.org/
- Falcon Player (formerly Falcon Pi Player aka FPP) - https://falconchristmas.com/forum/index.php?board=8.0
- Audacity - https://www.audacityteam.org/
- ZorinOS - Linux - https://zorin.com/os/
- xLights Model Creator - https://www.lightshowhub.com/tools/xlights-custom-model-builder
Why we build
We love to do this. Really and truly, as much as we run into time crunches with life, and frustrations with things just not quite working out exactly the way we planned, it's a blast. The final product is always a huge joy for us. We hope everyone who sees the shows is inspired, entertained, and leaves a little more happy than when they arrived.
It's one of those things I remember doing with my Dad when I was younger. My mom always wanted us to decorate, and it always happened to fall on the weekend after Thanksgiving because that's when I was home from college. I treasure that time I got to spend with him, freezing our butt's off out in the north wind hanging those very thin, glass, easily breakable C9 lights. We broke as many as we didn't, but we had fun. Mom always had a warm drink for us when we finished.
This is the first year in eight years of doing this at this house that it was relatively cold here. Most years it's in the 70's and 80's, but this year it was around 38 degrees, then wind was blowing, and my daughter and wife got to feel what i remember from my days doing this with my dad.
Best to you all, and hope you enjoyed the show!
Our Motivation
Why we do this
My wife's favorite holiday is, and always has been Halloween. Through background, my family is of Irish descent, and there is a good case showing that what we currently celebrate as Halloween (the candy, trick-or-treat, pumpkin carving, etc) started in Ireland.
My family's overall biggest celebrated holiday is Christmas. We love to decorate, and really it all started with my mom and dad. My father and I started doing this for my mom when I was in high school and college, and we just kept doing it.
Wen my wife and I returned to my home tow to move my parents in with us, we wanted to decorate the firstyear in our home, and my wife and father would disappear during the day only to return with a family member, their pickup truck, and a truck full of old decorations someone was giving away. She, my dad, and I would clean up these relics, and refurbish them to give them new light in our yard each year. My dad is gone now, but my wife, daughter, and I love to keep the tradition alive, and are advancing it forward with synchronized music and light.
We love to bring joy to others, and hope that our efforts in building these beautiful displays does just that. It's fun, and a great project for our entire family.
How we do this
- Planning and Ideation
- Design
- Build
- Setup
- Tear Down
Planning and Ideation
We sit down as a family to plan and share ideas on everything we could do, essentially brain-storming ideas. We then go back through and try to cut it down to what we realistically have time for, and look at how expensive it might be.
Essentially, no idea is off limits at first, but we pare it back to what we know we can build, afford to build, get setup and working, and have space to store. These are lessons we've learned the hard way.
Design
Once we've determined what we want to build, we start thinking about the design. My wife, and daughter are generally the designers, and I throw in my 2 cents here and there, which is usually left right there on the ground where it rightly belongs.
My wife, is a gifted artist, and can draw quite well free hand. She can imagine modifications, and is really impressive at pretty much everything she does.
Once, we design what we want, we start some estimations of how much material, and what types of materials we may need.
Build
First, we generally look at whatever material we have leftover from other projects. We do like to use up any materials we already have whenever possible, but it never fails that we need to get new material as well. Off to the hardware store! After a bit of shopping, discussion, more ideas, and usually comign back to our original plan, we have all the new materials we need.
Our General Material List for a Prop / Decoration
- Wood
- Screws
- Paint
- Clear Coat
- Glitter
- Glue
- Pixel lights (bullet style)
We try to make our decorations look nice in the daytime as much as at night when the light show is running, and fortunately my wife and daughter really have a great eye for that.
Material Prep
My wife will outline the decoration first in pencil. My father, before he passed a few years ago, would work with her, and taught her how to use all the power tools. She will use the table saw, skill saw, and jig saw to get the decorations cut out. I, being super useful, hold the wood while she cuts it. :-). My daughter and I will sand the wood to avoid splinters in the long run.
Next, my wife will draw the position of the holes for the lights. This is where I come in. Based on the size of the decoration, we need to figure out how many lights should be on a decoration. Since most light strings come in 50 and 100 lights per string, we try to keep the count to 25, 50, 100, etc. This keeps it so I don't have to cut too many strings and solder later.
My daughter and I drill out the holes using the drill press. Well, she drills the holes, and again, I hole the wood.
One more round of sanding, and it's ready for paint, glitter, glue, and finally we will need some way to mount the items in place for display. We mount things on our railing around the sidewalk, as well as place them in the ground using some fantastic stakes my wife found on Amazon...wooo hooo online shopping.
Light Installation
This is pretty much exactly what it sounds like, however, there is a bit of work involved. I take a photo of one of each decoration type, then use a great site to map the order for installing the lights. With these types of shows, each light has an address, and the software uses a model to know where a specific light is at on the decoration.
If you're interested in using this software, here's the site. It's really a great site, and makes it really very easy to model the decorations we build.
My wife, daughter, and I will use these model maps to install the lights in the right order and position.
Creating the lights and music
For the light display itself I use an incredibly powerful open source software available for Windows, MacOS, and Linux called xLights. It has so much power. It is filled with features, integrations to hardware, and absolutely makes this whole process so much better. With xLights, you have some incredible power at your fingertips.
If you are musically inclined, you can just tap out the beats to the various parts of a song, and create different timing tracks. These timing marks create a delineation for you to apply different effects to your various decorations. It's really up to you to decide which decorations work best for different tracks, and since it's your invention, no one can say you did it wrong.
This is really where I come in. Learning about, understanding, and figuring out how the lights, controller, music, raspberry pi, and everything fits together is a bit complex at first. I found some awesome YouTube creators who have really made it easier over time. I've pieced together the information in a way that makes sense to me, and now it's just a matter of remembering what I ened to do each time.
My workflow is pretty straight forward.
- Create a new xLights Project
- Import the Models I created for the decorations.
- In the Layouts tab, create my layout for the decorations (I use an image of my house and yard as a background to layer the decorations on, and dim the brightness of the image so it looks like night-time).
- Once those are laid out, I use the xLights ability to discover my controller board (I connect it directly to my computer, but you can also use a switch or router to connect them).
- Once discovered, xLights has a visualizer that allows me to assign various decorations to different ports on the board. The F16 controller can handle 1024 lights x 16 ports (so16384 lights). Understand this takes a lot of specialized wiring for keeping enough power flowing to the lights.
- Next, I start creating a new sequence. This is basically a big timeline, where you drag effects to be displayed on your decorations. Each effect is different at it's base level, but you can configure and customize all of the various aspects of the effect, such as timing, colors, fades, mixes, direction, blending, and so many more I couldn't possibly name them all here.
- Once I feel like the sequence is complete...it goes to my QA Team (Wife and daughter).
- Now I spend a few more days fixing all the things they don't like...hahaha, just kidding, they are usually good with what I have except for some colors (i'm partially color blind, so I depend on the internet to help Identify colors I need, and sometimes I forget to change them for different decorations).
- Next, upload the sequence and music to the Falcon Pi Player on the raspberry pi.
- Finally, get everything connected. This is a bit of a challenge as well. Depending on where you place your decorations, you may need a fairly long run of cable to reach them. If you have more than about 30 feet, you may need data signal boosting, and if you have a lot of lights on one port, you may need to do power injection. We don't yet use all of the 16 ports, so I'm trying to be better about spreading lights across more ports to keep from having to do power injection, but still you need to at times.
- Once it's all setup and connected, you can start testing, tweaking, checking cables, fuses, and so on, and so on. Troubleshooting is part of a show like this at every step in the process really.
Setup
Setup day is a big one. We generally get up early, try to have everything staged around the house, back porch and yard, and a plan for getting it all to the front.
We start moving things to the front as a group. Once we have a third of it out there, two of us start getting things put in their proper places. The last one will continue moving things around.
Eventually we are all putting decorations up. We do try to have a rough drawing or idea of where we want everything, and we work off of that. There are times where we realize what worked on paper isn't going to work in reality quite as well. A quick discussion, and we make changes on the fly.
This is usually an entire day, and sometimes a day and a half to get it all setup, connected, and functioning.
Tear down
What goes up, must come down. Indeed, I have some fairly stringent rules about not leaving decorations up all year round unless they are for a specific upcoming holiday. My rules are as follows:
Halloween Decorations
- Setup - The first weekend in October at the earliest
- Tear Down - The first weekend after Halloween
Thanksgiving / Fall Decorations
- Setup - The first weekend after Halloween
- Tear down - The first weekend after Thanksgiving
Christmas Decorations
- Setup - The first weekend after Thanksgiving
- Tear Down - January 6 (or shortly there after)
Valentines Decorations
- Setup - The last weekend in January
- Tear down - The weekend after Valentines Day
St. Patrick's Day Decorations
- Setup - The last Weekend in February
- Tear down - The weekend after St. Patrick's day
It seems like a lot, and honestly it is a lot, but we have fun, and we enjoy giving folks something to see during the holidays.
Thanks for coming by!