Nextcloud All In One
Install and initial setup of Nextcloud All-in-one AIO solution.
Install and Setup Nextcloud All-In-One (AIO)
Nextcloud has come a long way over the past few years. It is truly a tool for the self-hoster, the open source enthusiast, and now it is a spectacular tool for the Open Source Businessman. You need a way to communicate with your staff, users, clients, and vendors. You want a tool that can provide you an easy way to communicate in more than one method. NExtcloud provides that all in a package that you can run in Docker.
Nextcloud AIO is a great way to get started with the best Nextcloud has to offer.
You can Set tasks for yourself and your employees using the Tasks and Deck modules, and track progress on projects with clients, users, and even vendors through these great additional features.
You can setup Talk to have chat, audio, and video conversations and meeting with your various contacts. Speaking of Contacts, Nextcloud is a great way to keep up with your contacts and keep them in sync between your devices. Need a calendar to help keep your business and work life scheduled? Nextcloud has it.
What You'll Need
- Docker and Docker-Compose installed
- a Reverse Proxy (I use NGinX Proxy Manager)
- a Domain / Subdomain you own and can set an A-Record for.
- About 45 minutes
Installing Docker, Docker-Compose, and NGinX Proxy Manager
Installation via a Simple Script
You can easily install Docker-CE, Docker-Compose, Portainer-CE, and NGinX Proxy manager by using this quick install script I created and maintain on Github. Just use the command:
wget https://gitlab.com/bmcgonag/docker_installs/-/raw/main/install_docker_nproxyman.sh
To download the script to your desired host.
Change the permissions to make the script executable:
chmod +x ./install_docker_nproxyman.sh
and then run the script with the command:
./install_docker_nproxyman.sh
When run, the script will prompt you to select your host operating system, then will ask you which bits of software you want to install.
Simply enter 'y' for each thing you want to install.
At some point, you may be asked for your super user (sudo) password as well.
Allow the script to complete installation.
At this point, you might want to log out and back in, as this will allow you to use the docker and docker-compose commands without the need of sudo in front of them.
Installing Nextcloud AIO Master Container
Nextcloud AIO uses a master (main) container that you install first, and then uses access to the docker socket to then install and setup all of the Nextcloud containers for the full application.
First, let's create our "nextcloud" folder in our folder structure. I like to create a parent "docker" folder, then create all of my various applications in their own folders inside of that. So use the command
mkdir -p docker/nextcloud
That command will make the folders that don't exist, or use the folders if they do exist already.
Next, we'll move into the "nextcloud" folder, and create our "docker-compose.yml" file.
cd docker/nextcloud
nano docker-compose.yml
Now, copy and paste the following code block into that file.
version: "3.8"

volumes:
 nextcloud_aio_mastercontainer:
   name: nextcloud_aio_mastercontainer
services:
 nextcloud:
   image: nextcloud/all-in-one:latest
   restart: unless-stopped
   container_name: nextcloud-aio-mastercontainer
   volumes:
     - nextcloud_aio_mastercontainer:/mnt/docker-aio-config
     - /var/run/docker.sock:/var/run/docker.sock:ro
   ports:
     - 8080:8080 # change the port on the left side if it's already in use on your host system.
   environment:
     - APACHE_PORT=11000  # change this port number if 11000 is already in use on your host system.
     - APACHE_DISABLE_REWRITE_IP=1
     - NEXTCLOUD_TRUSTED_DOMAINS=< nextcloud.your-super-domain.com > < 192.168.1.129 > # Your domain name + proxy host IP
     - TRUSTED_PROXIES=< 192.168.1.129 > # proxy host IP
In the above compose sample file, you'll need to look at a few things on your host machine to determine if you need to change them in the file. First, make sure that both ports 8080 and 11000 are not currently in use on your host machine. If either of them are in use, then change the corresponding port in the file.
For the port mapping of 8080:8080, only change the port number on the left side of the colon (:). DO NOT CHANGE the right side.
Next, you'll want to change the values surrounded by the less than "<" and greater than ">" signs on the last two lines of the compose file. Here you'll want to put in the subdomain you want for your Nextcloud AIO install.
YOU MUST USE A SUBDOMAIN for this install.
Next, you'll want to change the LAN IP of the proxy to be the proper and correct LAN IP of your reverse proxy host on both of the last two lines of the file as indicated.
Once you've made all of the necessary changes, save the file with CTRL + O, then press Enter to confirm, and CTRL + X to exit the nano editor.
Now we can run the docker-compose file with the following command:
docker-compose up -d
The image for the nextcloud-master-container should now pull down, and start up. After you see the "done" message in the terminal, and are returned tot he prompt, wait about 30 seconds, then in your favorite browser, go to https://<your host machine IP>:8080 (or the port you changed 8080 to in the compose file).
I went to https://192.168.10.42:8080
When the page loads, you'll be greeted by a message, and will be provided a very long password. Copy this password, and store it somewhere secure like a Bitwarden, or Vaultwarden vault. You'll need it in the next step as well, but may also need it in the future.
Once you've copied the password for access later, click the 'Continue' button.
Now, paste the password into the blank provided, and click 'Log In'.
You'll now see a page with a couple of blanks. The first is a blank requesting the FQDN (Fully Qualified Domain Name) of your Nextcloud AIO instance.
Please make sure to create an entry in your reverse proxy for the subdomain / domain you want to use for this instance, and ensure it's pointed to the host IP, and port 11000 (unless you change this port to another number, then use that port number). Additionally, make sure you setup SSL for this subdomain with certificates from a provider, or from LetsEnctrypt.
Once you enter your domain name into the form in the Nextcloud Master Container page, and click the Check URL button, the master conatiner will verify that the domain can be reached as typed on an SSL encrypted connection. If it can't you'll get an error, and have to fix this issue before you can proceed forward. There is an option you can set in the docker-container to disable this check, but I recommend against doing that, as the check should pass if your domain is setup correctly and can be reached.
Installing Nextcloud and All of the Modules
Once you pass the domain check in the Nextcloud Master Container, you'll be presented with a list of modules and a checkbox next to those options. Check each option you would like installed in your Nextcloud instance, then click the 'Start Containers' button.
BE PATIENT! The next part will take anywhere from 5 to 25 or 30 minutes.
Now, we wait. In the background, the Nextcloud Master Container is pulling down all of the images for each of the Nextcloud modules that will run. It then starts those containers (much like Portainer, or Yacht do). This process takes a bit of time, but you should be able to see the status of each container in the user interface of the Master Container. It will usually refresh on it's own, but if you see it stop refreshing for a quite a while (several minutes) there should be a button to refresh / reload the data on the page. Feel free to click it. Once you see the message that all containers are in a 'Running' state, you'll get a button to Open Nextcloud, and you'll be provided a username (usually admin) and a randomly generated, long strong password for your initial login. Make sure to copy that password and use it to login to your Nextcloud install the first time.
How Do I Change the Storage Location on AIO?
Many of you asked me, after I posted the video, how to change the storage location for the NextCloud AIO install. I have done the research and found the way. A few things to know first:
- If at all possible, it's extremely important for you to set this environment variable before you ever run the AIO for the first time.
- If you've only started the AIO and haven't yet really invested a ton of time in syncing data, setting up users, and so on, this might be a good time for you to stop what you're doing, and really decide if you'd rather start again, but with this environment flag set.
- If you are already fully set in your AIO install, and have data syncing everywhere, fear not! I was in this same situation, and it is possible to still switch your main storage location, but it definitely requires a bit more work, time, and willingness to work through any issues that may come up. Overall, it was a pretty smooth process.
- Before you begin anything, make backups! Yes, that's plural. Make a backup using the built-in Borg Backup tool, as well as running an rsync backup of the data folder.
- Last, but certainly not least, check the NextCloud AIO documentation to make sure these steps are still the recommended process.
First, let's just discuss how to tell Nextcloud AIO to use our chosen storage location. For this, we use an environment variable in our Nextcloud AIO Mastercontainer docker-compose.yml file called NEXTCLOUD_DATADIR. This variable does exactly what it seems like, and defines the storage location we want. In my case, I created a 1.5 TB allocation, and attached itto the VM where I run Docker. I then added the path to that location in this variable in the master-container docker compose definition file.
If you haven't already started running AIO, then you can define the path now, and it will be used from the very start of your Nextcloud usage, and you're essentially done. If, however, you've not done that, and you are already using your Nextcloud AIO in production, then there is more work to be done.
Here's what our updated docker-compose.yml file will look like with the changed option. Assume our chosen storage pasth is at /mnt/big_storage/nextcloud
version: "3.8"

volumes:
 nextcloud_aio_mastercontainer:
   name: nextcloud_aio_mastercontainer
services:
 nextcloud:
   image: nextcloud/all-in-one:latest
   restart: unless-stopped
   container_name: nextcloud-aio-mastercontainer
   volumes:
     - nextcloud_aio_mastercontainer:/mnt/docker-aio-config
     - /var/run/docker.sock:/var/run/docker.sock:ro
   ports:
     - 8080:8080 # change the port on the left side if it's already in use on your host system.
   environment:
     - APACHE_PORT=11000  # change this port number if 11000 is already in use on your host system.
     - APACHE_DISABLE_REWRITE_IP=1
     - NEXTCLOUD_TRUSTED_DOMAINS=< nextcloud.your-super-domain.com > < 192.168.1.129 > # Your domain name + proxy host IP
     - TRUSTED_PROXIES=< 192.168.1.129 > # proxy host IP
     - NEXTCLOUD_DATADIR=/mnt/big_storage/nextcloud
I'm already using NextCloud AIO in Production... How do I change my storage location?
Not to worry, I was in the same boat. You must, and I mean must make multiple backups of your data before you start trying to change the storage location. This is just plain common sense, but I'm begging you not to rely on a single backup when making this change.
First, stop your nextcloud-aio-apache container, either from the command line, or using a tool like Portainer. Use whatever works best for you. From the cli, the command:
docker stop nextcloud-aio-apache
should get it stopped for you. Now you should be able to navigate to
https://<your nextcloud server ip address>:8080 (or whatever port you mapped in the docker-compose).
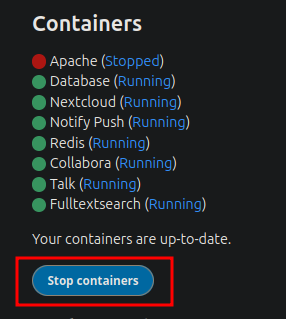
You'll be asked for your AIO Master Container password. Once you enter it, you'll see an interface where you have the option to stop the containers, make backups, change the master container password, etc.
- Stop the containers. It's important to stop the containers to keep any syncing of data from happening while we make our backup.

- Once they are stopped, expand the Backup section on this page, and scroll down until you see the option to 'Create Backup'.

- When the Borg Backup is complete, leave the containers stopped, and login (SSH) to your server running NextCloud AIO. You'll want to go to the path /var/lib/docker/volumes/nextcloud_aio_nextcloud_data and copy or rsync all of the data in the _data folder to back it up as well. This is our safetly backup, just in case. Best to back it up somewhere on a different machine, flash drive, external driver, NAS, etc.
cd /var/lib/docker/volumes/nextcloud_aio_nextcloud_datarsync -avzP ./_data <your_user>@<some_other_machine_ip>:/home/<your user>/nc_backup_data/ - Make sure the path you are backing up to, exists before you start.
- Add the NEXTCLOUD_DATADIR path you want for your primary storage location to the docker-compose.yml file.
- Stop your NextCloud AIO Master Container, again using the CLI or a tool like Portainer.
docker stop nextcloud-aio-mastercontainer - Now. Bring up your docker-compose again so it will take the updated storage path.
docker compose up -d - Now, you'll want to go back to your NextCloud MasterContainer login at the https://<your nextcloud aio ip>:8080 (or whatever port you mapped and re-authenticate if necessary.
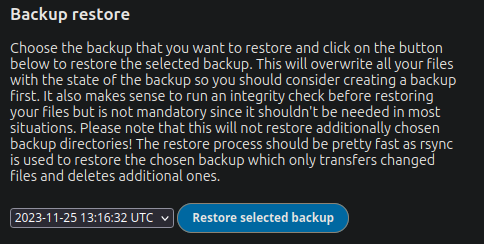
- We need to go to the Backup section again, and now restore the last backup we made.

- Choose the most recent backup date / time, and click on the 'Restore selected backup' button. Follow any confirmation rpompts and restore your data.
- I used the tool "nmon" in the terminal to watch my disk reads from the primary drive, and see that my newly added 1/5 TB drive was doing writes. This gave me some confidence that the backup was being restored to the new location.
- When the Master Container page shows the backup is restored, you can use the 'Start Containers' button to restart all the containers. Be patient as they restart, and keep an eye on that page. It will show you when everything is upu and running.

Now it's time to test your migration and make sure you can log in.
NOTE: I did have to go through this process twice. My first restore did not work properly, though I have no idea why. But after deleting the restored data from my new drive, and re-running the restore, everything came up with no issues, and I had much more space for my NextCloud AIO install.
Once you are comfortable with the new data storage location being intact and valid, you can delete the old data from the /var/lib/docker/volumes/nextcloud_aio_nextcloud_data/_data to save space.
What's Next?
Now that you have Nextcloud up and running, I highly recommend logging in with the given admin user, and going immediately to Users, creating a new admin level user with a long strong password, logging out of the given admin user, and logging in with your new user. Then, delete the admin user that was auto-created for you.
Now, go forth and be productive with all of the amazing features you're running on your new Nextcloud All-in-One installation.