Open Source Note Taking
Trilium Notes
Install Trilium Notes Syncing Server and Desktop App
Trilium Notes is an impressively powerful note taking application with a lot of great add-on features that allow for chart drawing, mermaid charts, Latex style numerical formulas and much more.
It boasts a syncing server that is fairly easy to setup, as well as desktop applications for Linux, MacOS, and Windows. The web application available via the syncing server is a literal clone of the desktop application experience, and is responsive so it works well on all of your devices.
As you can see above, the webview on the mobile device is quite usable. In fact, I'm writing up this guide using Trilium Notes. I'll copy / paste it to my Show Notes afterward…and let you know how well it converts in the Show Notes at the end.
What You'll Need
- Sync Server
- Docker-CE and Docker-Compose installed
- (optional) NGinX Proxy Manager (for access from the internet)
- Client
- A Linux, MacOS, or Windows based PC
- Mobile
- A Web Browser
- Time
- About 15 minutes
Installation of Docker-CE and Docker-Compose (optionally NGinX Proxy Manager).
You can easily install Docker-CE, Docker-Compose, Portainer-CE, and NGinX Proxy manager by using this quick install script I created and maintain on Github. Just use the command:
wget https://gitlab.com/bmcgonag/docker_installs/-/raw/main/install_docker_nproxyman.sh
To download the script to your desired host.
Change the permissions to make the script executable:
chmod +x ./install_docker_nproxyman.sh
and then run the script with the command:
./install_docker_nproxyman.sh
When run, the script will prompt you to select your host operating system, then will ask you which bits of software you want to install.
Simply enter 'y' for each thing you want to install.
In this case, that will be Docker-CE and Docker-Compose at a minimum, but you can also optionally install NGinX Proxy Manager if you don't already have and use another reverse proxy for your network.
At some point, you may be asked for your super user (sudo) password as well.
Allow the script to complete installation.
At this point, you might want to log out and back in, as this will allow you to use the docker and docker-compose commands without the need of sudo in front of them.
Install Trilium Notes Sync Server
I like to use a convention for keeping my docker containers organized. I create a parent level “docker” folder, then create an application / service folder for each application / service i want to run inside that parent folder. This allows me to run a simple backup where I just get all of the volumes and data and docker-compose files in one simple folder or zipped up file of folders under the parent “docker” folder level. If anything goes wrong I can bring the whole thing back up quickly, or even just pull out the application or service I may need.
For this reason I'll create a folder structure on my server like this:
mkdir -p docker/trilium_notes
The command above tells my system to use an existing “docker” directory if there is one, and if not, then create it, and the “trilium_notes” directory inside of it.
Next, we'll move into our new application directory with the command:
cd docker/trilium_notes
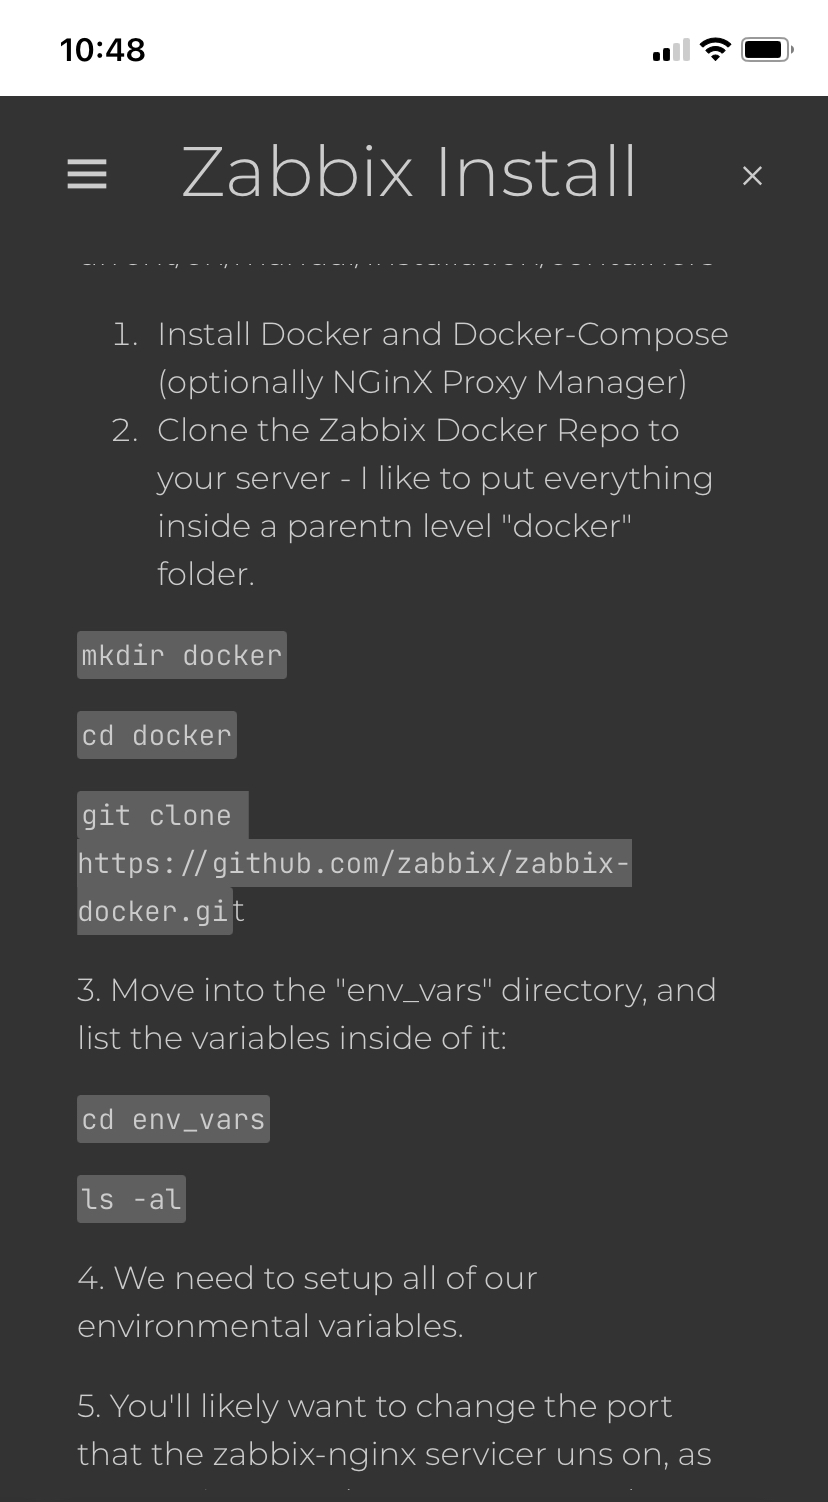
Now we need to create our docker-compose.yml file where we'll define our Trilium Notes sync server application. I use the nano text editor in the terminal, but if you're using a desktop environment, or prefer some other text editor, feel free to use your favorite.
nano docker-compose.yml
Next, copy the yaml code block below, and paste it into your fresh “docker-compose.yml” file. You can use CTRL+C to copy, and CTRL + Shift + V to paste into a terminal window.
version: '3.3'
services:
  trilium:
    ports:
      - '8080:8080'
    volumes:
      - '~/trilium-data:/home/node/trilium-data'
    image: 'zadam/trilium:0.56-latest'
The above code block will do a few things.
- It will create a service called “trilium”.
- It will forward your server's host port of 8080 to the container port of 8080. If you are already using the port 8080 on your host, you'll want to change the left side port number to some other port that is not in use on your host server. In my case I change it to 8295. So my port mapping looks like
- ‘8290:8080’ - It will setup a volume in the current directory (./docker/trilium_notes/) called “trilium-data”, and map that to the container location of “/home/node/trilium-data”. This is a good thing, as this is where our Trilium data is going to be stored, and it will be persisted between docker container updates, as well as being backed up if you setup backups of your “docker” parent folder.
When you've got the code block in your file, and you've made the port mapping change (if needed), you can save the file with CTRL + O, then press Enter to confirm. Take one last look and make sure everything looks ok. Remember, yaml code is space dependent, so make sure everything that is indented, is indented 2 spaces past it's parent item. Formatting should be good from my guide, but sometimes spacing can get off a bit.
Now press CTRL + X to exit the nano text editor.
Finally, we'll bring up our Trilium Notes syncing server with the command:
docker-compose up -d && docker-compose logs -f
This is really two commands concatenated together with the ‘&&’ signs. The first part docker-compose up -d starts our image pulling down, and starts our container as a daemon in the background so it continues to run even if we close the terminal window. The second part docker-compose logs -f tails the logs for us after the container is started. This just allows us to watch for any errors when we first start a new container.
Once, the image has downloaded, and the container is started, you'll see log output. When the output slows, or stops filling the xcreen with new information, you'll want to navigate in your favorite browser to the Web UI. You'll use the IP address of your host server (or localhost if you are running it on the same machine you are using), and the port you set on the left side of the por tmapping (I used port 8295).
I went to https://192.168.10.42:8295 in my browser.
Here' you'll be presented with the first run wizard for Tilium Notes. You'll need to choose whether you want to create a new notes document, or whether you have a server you want to sync, or a desktop client you want to sync. In our case, this is new, so we can choose the first option, then click the “Next” button.
Now you'll be prompted to create a password for your Trilium Notes system. Choose a long, strong pasword, and use something like Vaultwarden / Bitwarden to store the password so you don't have to remember it. Even better, use one of those apps to generate a strong password for you.
Click Finish and you'll be logged into your new Trilium Notes server. You'll see some preset (demo) notes that will help you see what all you can do with Trilium right out of the box. I have kept those demo notes so I can reference them as I continue to use the application and grow into it's capabilities.
The Trilium Desktop App
Next, you'll likely want a desktop app for keeping up with your notes as well. You may ask, “Why would I want a desktop app if I can just use the server for notes?” A valid question for certain.
The biggest reason, at least for me, is that the desktop app saves your notes locally on the desktop machine, but once you add the syncing server, the desktop app will also sync those notes to the server, and if you add notes or edit them directly on the server through a web browser, when you open the desktop app and it connects, it will sync those changes over.
- This is a great duplication strategy for not losing notes.
- Offline functionality on the desktop in case you don't have a network connection, or are outside the network where you have syncing setup.
There are builds for your various Desktop Operating Systems (OSes). For Windows there are .exe options in a zipped file, and for MacOS there are packages, also in a ziipped file. For LInux, you can get a .deb, or a zipped file with a binary in it, but I highly recommend getting it from Flathub as a Flatpak for Linux.
No matter which way you decide to install, get the desktop installed, then run it. You'll be presented again with the first run wizard. In order to start the app syncing with the server, you'll want to select option 3, then click next. Here, you'll be prompted to enter your server address, port, and Trilium Notes password. The proxy server address, is generally not something you'll need, but if you use a proxy server in order to reach the internet (and are serving your syncing server to the internet), or you need a proxy server to get to the rest of your network, then 1. you should know that already. 2. You should enter that information in the blank provided.
Once you've entered all of the data needed, click “Finish Setup”, and you should get your new Desktop app interface in front of you. On the left icon panel, you should see an icon near the bottom that looks like a Wifi signal icon. This icon should show white, with no other indicators near it when everything is synced. It will show slightly differently when you need to sync a change, or if it's not connected to your server. If you see it's not connected, just open the desktop app settings by clicking the Trilium logo in the upper left corner.
Trilium Icon >> Options >> Sync
This path will get you to the Syncing form. Double check your entries, then use the test button to make sure the sync is working.
Conclusion
You are set. You can now start taking notes like crazy, and you'll have some amazing syncing going on. If you are interested in syncing over the internet, then definitely check out my tutorials on setting up NGinX Proxy Manager, and using ti to expose your services to the internet, as well as getting valid SSL certificates through LetsEncrypt. It's a whole other guide, but well worth your time as you become a self hoster.
Anchor Notes
A self hosted, open source Google Keep-like Note Taking system.
Install and Setup Anchor Notes
Link to the Project
https://github.com/zhfahim/anchor
Install OS and Update
Update and upgrade your server's packages using the following commands:
- For Ubuntu/Debian:
sudo apt update && sudo apt upgrade -y- For RedHat/CentOS/Fedora/Alma/Rocky:
sudo dnf update -yCreate a Non-Root User
Create a non-root user with superuser (sudo) privileges:
1. Add a new user using
adduser <username>2. Set the password for this user.
3. Enter the relevant information (optional)
4. Enter 'Y', then press Enter.
5. Add the user to the "sudo" group:
- For Ubuntu/Debian:
usermod -aG sudo <username>- For RedHat/CentOS/Fedora/Alma/Rocky:
usermod -aG wheel <username>Now, you can log out of the system, and log back in as your new non-root super user.
Install Docker and Docker Compose
Install Docker and Docker Compose on your server:
1. Install the curl utility:
- For Ubuntu/Debian:
sudo apt install curl -y- For RedHat/CentOS/Fedora/Alma/Rocky:
sudo dnf install curl -y2. Run the command to install Docker and Docker Compose:
curl https://get.docker.com | shAdd Your User to the Docker Group
Add your non-root user to the docker group so you can use Docker commands without sudo:
sudo usermod -aG docker <username>Install Anchor in Docker
We’ll make a directory for our installation with
mkdir -p docker/anchor
Let’s move into the folder with
cd docker/anchor
We’ll make our ‘compose.yaml’ file which will hold our application setup configuration.
---
services:
  anchor:
    image: ghcr.io/zhfahim/anchor:latest
    container_name: anchor
    restart: unless-stopped
    ports:
      - "3000:3000"
    volumes:
      - ./anchor_data:/data
You can edit the left side port number on the port mapping if your host happens to be using port 3000 for some other service.
For instance, if you need to use port 8212, then your port mapping should look like
    ports:
      - "8212:3000"
With this setup, you can save the file with CTRL + O, then press Enter to confirm, and exit the nano editor with CTRL + X.
We can pull our images with
docker compose up -d && docker compose logs -f
This is two commands concatenated into one line. The first command docker compose up -d tells docker compose to bring up the containers based on any images pulled down for the application or service. The second part, docker compose logs -f tells docker compose to show me the log output live follow so that we can look for any errors or issues. You don’t need to run the second part of the command every time, just the first time, or if you make changes to your ‘compose.yaml’.
Generally you can just do docker compose up -d.
If you don’t see any errors in the logs, you can stop watching the logs with CTRL + C.
Before we get on to checking out the User Interface, let’s talk about a few other options you can set in the ‘compose.yaml’ file.
First, you can setup your own generated JWT_SECRET. To do this, run this command in your terminal:
openssl rand -base64 32
This will generate a 32 character, random, base 64 key for you to use. NOTE: If you don’t set this up, the system autogenerates one for you.
Next, we have the option to use your own external PostgreSQL database. Again, if you don’t set these up, the system will generate a PostgreSQL database for you and use it. I prefer the included DB as this makes it easier to back everything up all together.
PG_HOST |
No | (empty) | External Postgres host (leave empty for embedded) |
|---|---|---|---|
PG_PORT |
No | 5432 |
Postgres port |
PG_USER |
No | anchor |
Postgres username |
PG_PASSWORD |
No | password |
Postgres password |
PG_DATABASE |
No | anchor |
Database name |
Finally, we have the option to setup our own authentication provider such as Authentik, Authelia, Keycloak, etc. The system supports OIDC (Open ID Connect) for authentication, which means you get the option for SSO with a bunch of your other applications.
OIDC_ENABLED |
No | — | Enable OIDC authentication |
|---|---|---|---|
OIDC_PROVIDER_NAME |
No | "OIDC Provider" |
Display name for the login button |
OIDC_ISSUER_URL |
When OIDC enabled | — | Base URL of your OIDC provider |
OIDC_CLIENT_ID |
When OIDC enabled | — | OIDC client ID |
OIDC_CLIENT_SECRET |
No | — | OIDC client secret. Omit for public client (PKCE) |
DISABLE_INTERNAL_AUTH |
To add these items, or the PostgreSQL variables to your ‘compose.yaml’ file, just edit it with
nano compose.yaml
Then add the environment section, and add each item under as shown below. Fill in the values that are correct for your setup, of course.
---
services:
  anchor:
    image: ghcr.io/zhfahim/anchor:latest
    container_name: anchor
    restart: unless-stopped
    ports:
      - "3000:3000"
    volumes:
      - ./anchor_data:/data
    environment:
      - JWT_SECRET=<some long string of chars and numbs>
      - PG_HOST=10.21.215.121
      - PG_PORT=24314
      - PG_USER=anchor
      - PG_PASSWORD=<some long strong password>
      - PG_DATABASE=anchor
      - OIDC_ENABLED=true
      - OIDC_PROVIDER_NAME=Authentik
      - OIDC_ISSUER_URL=https://your-oidcprovider.net/o/auth/somename
      - OIDC_CLIEND_ID=5omelonGCLientId
      - OIDC_CLIENT_SECRET=someRalLyL0ngS3cre7Th4atI5N07PubLiC
      - DISABLE_INTERNAL_AUTH=true # if you are using OIDC
Once you’ve added the environment variables you need, save the file with CTRL + O, then press Enter to confirm, and exit the nano editor with CTRL + X.
Again, run docker compose up -d to restart your application, and take in the configuration updates.
Test the User Interface
Once you’ve setup the app and started it running, open your favorite modern browser, and navigate to the IP address of your host machine, and the port on which you setup the application.
Something like https://192.168.1.44:3000
If everything has gone properly, you’ll be presented with the login screen (or int he case of SSO, the option to get to your SSO login).
You should now be able to setup an account and / or login to an account and start using Anchor for all of your note taking needs.
Setup a Reverse Proxy
We use a reverse proxy when we want to access our web applications from outside of the local network where it’s hosted. IF you setup Anchor on a VPS with a Public IP address, you don’t specifically need a reverse proxy to route to it, but reverse proxies can help with keeping traffic controlled through ACLs (Access Control Lists), obfuscate your applications public IP, and get freely available LetsEncrypt SSL certificates to ensure the encryption of your data across the internet.
I use the Pangolin Reverse Proxy, but there are many out there to choose from. If you prefer a different one, i assume you know how to set it up. If you are looking for a tutorial to help you get a Reverse Proxy setup, then let me point you to one of mine.
Install and Configure Pangolin Reverse Proxy
Support this Channel and Content
Become a Patron at Patreon
Be me a Coffee or Beer at Paypal
Paypal Support for Awesome Open Source