Backup Docker Data and Configs
Backing up your application data regardless of how you run it is one of the most vital things you'll need to do as a self-hoster, a system administrator, or just a daily user of software. The topic is vast, and full of amazing options, and amazing software.
One of the questions I'm asked often, is how to backup Docker. While this seems simple and straight forward enough, there is actually quite a bit involved in such a question. Docker, is in reality, a system for running virtualied applications that are segregated from the host system in a virtualizatioin layer called "Docker". You may be using Podman, LXD (pronounced "Lex-Dee"), LXC (pronounced "Lex-Cee", and the CT option available in Proxmox), or even Kubernetes. These are all virualization layers that segragate the applications from the host system in one way or another, while utilizing the underlying hardware of the host system. The idea of backing up "Docker" is really not in backing up one thing, but in backing up many things.
Docker applications have a myriad of things you'll likely want to back up. The command you use to start them (often a docker-compose.yml file, or a `docker run` command that you could save as a .txt file for reference when needed), mapped volumes (the place where you store the application data you want to persist), and any configuration files (also, often mapped to a file on the host system through a `bind`).
The first step to being able to do this more easily is setting up your docker applications in a hierarchy that will make it much easier to do. I try to do this on all of the docker containers I setup in my videos. The idea is to create a top level "docker" directory, and then create a new directory for each application you run inside of it.
The tree looks something like this.
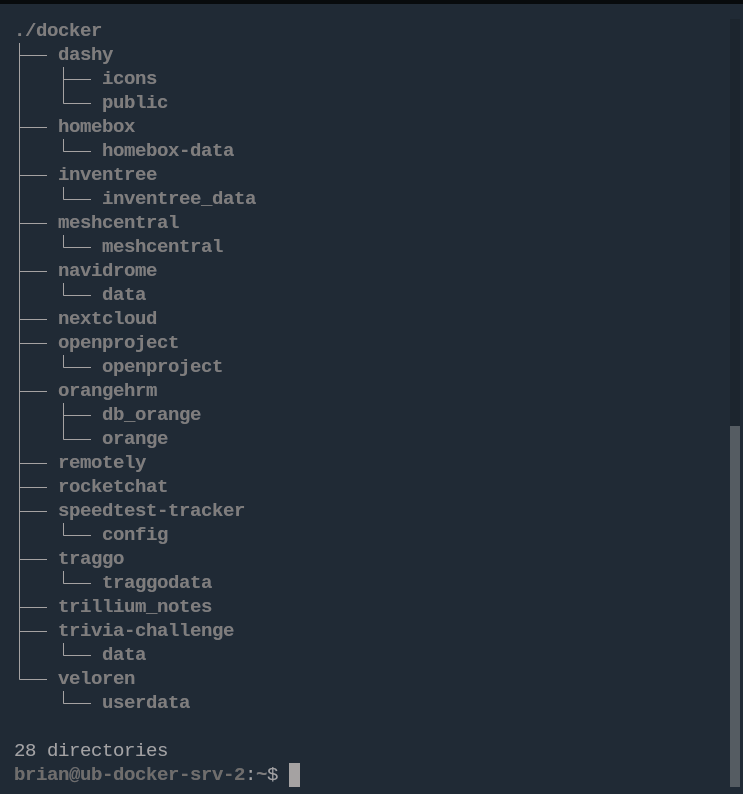
Above, you can see I have multiple applications inside my "docker" folder, and inside each of those application folders, are the mapped folders for that application's data. The best thing about taking this approach is that you have all the docker information in one place. The `docker-compose.yml` files, the `.env` files, the application data, is all inside the top-level "docker" directory.
Now, we just need to create a method to back it all up. You have many choices. You could just copy the whole folder, as-is. over to a USB drive, another machine on your network, a NAS, or even cloud storage. I, however, prefer to compress the folder into a tar.gz archive as it saves a great deal of space.
The Gotcha
One thing to know about this process is that if you copy the data, compress the data, take any action on the data outside of the container while it's running, you could potentially end up with a corrupted backup. Many of these applications use databases of some sort to store their data, and that is what is mapped in those volumes we are backing up. Databases are great, but finicky about changes when they are in the middle of writing data. There is a solution though.
The Solution
Use a simple script to do what we need.
- Stop our containers using our `docker-compose.yml` files.
- Create a compressed archive of the "docker" folder.
- Start our containers back up.
- Copy our archive to our backup location.
How do we do it?
I have a script here for you to start with. Now you can get really fancy, or leave it really simple. It's really up to you. But, this will work well if you organize your docker setup as I have described above. I know, that may mean a bit of work on your part to get things in order, but trust me, it will make it sooooo much easier. If however, you don't want to do that, it will still work, you just need to find where your data is stored on the local volume. Docker has a standard location for storing volume data, but it varies from OS to OS, so definitely look up where it puts data for your OS. Also, some docker-compose files will put data in other places, so you need to look through them and make sure you know where the data is being mapped in your system. Once you've done that, you can add those locations to your archive in the script. I'll point out where for you.
#!/bin/bash
backupDate=$(date  +'%F')
echo $backupDate
cd /home/brian/docker
cd dashy
docker-compose stop

cd ../meshcentral
docker-compose stop

cd ../navidrome
docker-compose stop

cd ../speedtest-tracker
docker-compose stop

cd ../remotely
docker-compose stop

cd ../traggo
docker-compose stop

cd ../trillium_notes
docker-compose stop

cd ../veloren
docker-compose stop

cd ../homebox
docker-compose stop

cd /home/brian/
tar -czvf docker-backup-$backupDate.tar.gz /home/brian/docker

cd docker/speedtest-tracker
docker-compose start

cd ../navidrome
docker-compose start

cd ../meshcentral
docker-compose start

cd ../dashy
docker-compose start

cd ../remotely
docker-compose start

cd ../traggo
docker-compose start

cd ../trillium_notes
docker-compose start

cd ../veloren
docker-compose start

cd ../homebox
docker-compose start

# now go back to home, and copy my backup file to my NAS
cd /home/brian
echo ""
echo "Backup copy is running..."
scp docker-backup-$backupDate.tar.gz /mnt/data/

# remove the tar file from the main home folder after it's copied
rm docker-backup-$backupDate.tar.gz
In the script above, we do exactly what I said. There are a couple of extra lines that just give out some feedback about the script, but everything else is doing what needs to be done.
1. create a date variable to add as part of our backup filename.
backupDate=$(date +'%F')
2. Move into our docker folder, then into each application folder, and use our docker-compose.yml file to stop our containers. The benefit of docker-compose in this case, is that some applications use multiple containers, so running the docker-compose stop command stops all of the containers for that application.
cd /home/brian/docker
cd dashy
docker-compose stop

cd ../meshcentral
docker-compose stop

cd ../navidrome
docker-compose stop

...
3. Zip up (archive and compress) the entire "docker" directory, which given the right structure, has all of our configuration data, mapped volume data, and docker-compose.yml files in it, and store the resulting tar.gz in our home directory.
cd /home/brian/tar -czvf docker-backup-$backupDate.tar.gz /home/brian/docker
4. Start our containers back up, again using docker-compose as it starts up all containers for any application with the single docker-compose start command.
cd docker/speedtest-tracker
docker-compose start

cd ../navidrome
docker-compose start

cd ../meshcentral
docker-compose start

...
5. Finally, we copy the resulting tar.gz file off to our chosen backup location. This can be another machine, a USB drive, a NAS, or even a cloud storage option. In fact, doing more than one location would be ideal.
# now go back to home, and copy my backup file to my NAS
cd /home/brian
echo ""
echo "Backup copy is running..."
scp docker-backup-$backupDate.tar.gz /mnt/data/

# remove the tar file from the main home folder after it's copied
rm docker-backup-$backupDate.tar.gz
At the end, we remove the tar.gz file we created from our home directory to keep it all cleaned up.
Some other things to consider adding over time.
Keep your archives cleaned up. A one liner can remove old files from the folder or location. Just add it to the beginning of the script. find /mnt/data/* -mtime +5 -exec rm {} \;
The above line will look at the files in the /mnt/data folder (which is where I'm backing up to), and remove any files in that location older that 5 days. This gives us a running five day backup schedule when running daily backups.
2. You can also keep a log of what is being done
echo " Stopping all containers..." >> /home/brian/docker-backup/logs/$backupDate.log
You can put any information you want inside the quotes. It's just a good way to see where the process may have stopped if it didn't complete at some point.
Now, you have a functional script that you can setup inside Cron if you want, and have it run on a daily, weekly, monthly basis.
Cron Jobs
I'm going to give you a very, intentionally, brief overview of setting this script up as a cron job. This is in now way intended to be a full overview of cron, nor how to use it.
A couple of things to understand about Linux cron. First, the syntax for stting a time for a job to run.
m h dom mon dow
These are:
m - minute
h - hour
dom - day of month (the numeric date)
mon - month (the numeric month with January being 1)
dow - day of week (the numeric day of the week with Sunday being 0)
So, if we want our job to run at 2 am every day, we'll use the format
0 2 * * *
We want to put this in the super user crontab, because our script needs to run with sudo privileges. Docker has a lot of stuff that requires sudo privileges to manipulate.
So, with the command:
sudo crontab -e
We will set our scheduled script to run. The first time you run the crontab command, it will ask you to choose the text editor you want to use for editing cron jobs. Just enter the number next to your preferred editor, and it will open a window to add cron jobs.
Once opened, you'll move to the bottom of the file, and enter a line with the time for the job to occur, followed by the command or script to run. In our case, we'll do:
This will run our script at 2 am each day.
You're done. You're set, and now any applications you add under the "docker" directory will simply be backed up along with everything else. Keep in mind, you'll want to add each applications "docker-compose stop" and "docker-compose start" sections to the script.
Support My Channel and Content
Support my Channel and ongoing efforts through Patreon:
https://www.patreon.com/awesomeopensource