Headscale + Tailscale Clients
What You'll Need
- Docker-CE and Docker Compose Installed on your Host Server
- (Optional) NGinx Proxy Manager, or a reverse proxy of your choice
- (Optional) A Domain Name or Subdomain for your Server (e.g. headscale.yourdomain.org)
- About an hour of your time
Installation
Installation of Docker, Docker Compose, and NGinX Proxy Manager via a Simple Script
You can easily install Docker-CE, Docker-Compose, Portainer-CE, and NGinX Proxy manager by using this quick install script I created and maintain on Github. Just use the command:
wget https://gitlab.com/bmcgonag/docker_installs/-/raw/main/install_docker_nproxyman.sh
To download the script to your desired host.
Change the permissions to make the script executable:
chmod +x ./install_docker_nproxyman.sh
and then run the script with the command:
./install_docker_nproxyman.sh
When run, the script will prompt you to select your host operating system, then will ask you which bits of software you want to install.
Simply enter 'y' for each thing you want to install.
At some point, you may be asked for your super user (sudo) password as well.
Allow the script to complete installation.
At this point, you might want to log out and back in, as this will allow you to use the docker and docker-compose commands without the need of sudo in front of them.
First, let's create our docker folder structure. We want our application folder inside of a parent “docker” folder. We can do this with one command:
mkdir -p docker/headscale
The command above asks, “Does the ‘docker’ folder exist? If so, use it. If not, create it.” Then it moves to the next part of the path we gave, and asks, “Does the ‘headscale’ folder exist? If so, use it. If not, create it.”
Now we'll move into our new headscale folder.
cd docker/headscale
Headscale Configuration FIle
Now copy down the Headscale sample configuration file, to a file named “config.yaml” inside a subfolder called “config”.curl https://raw.githubusercontent.com/juanfont/headscale/main/config-example.yaml -o ./config/config.yaml
This is a sample file for the Headscale configuration.
---
# headscale will look for a configuration file named `config.yaml` (or `config.json`) in the following order:
#
# - `/etc/headscale`
# - `~/.headscale`
# - current working directory

# The url clients will connect to.
# Typically this will be a domain like:
#
# https://myheadscale.example.com:443
#
server_url: http://headscale.yourdomain.org:8080

# Address to listen to / bind to on the server
#
# For production:
listen_addr: 0.0.0.0:8080
# listen_addr: 127.0.0.1:8080

# Address to listen to /metrics, you may want
# to keep this endpoint private to your internal
# network
#
metrics_listen_addr: 127.0.0.1:9090

# Address to listen for gRPC.
# gRPC is used for controlling a headscale server
# remotely with the CLI
# Note: Remote access _only_ works if you have
# valid certificates.
#
# For production:
grpc_listen_addr: 0.0.0.0:50443
# grpc_listen_addr: 127.0.0.1:50443

# Allow the gRPC admin interface to run in INSECURE
# mode. This is not recommended as the traffic will
# be unencrypted. Only enable if you know what you
# are doing.
grpc_allow_insecure: false

# Private key used to encrypt the traffic between headscale
# and Tailscale clients.
# The private key file will be autogenerated if it's missing.
#
private_key_path: /var/lib/headscale/private.key

# The Noise section includes specific configuration for the
# TS2021 Noise protocol
noise:
  # The Noise private key is used to encrypt the
  # traffic between headscale and Tailscale clients when
  # using the new Noise-based protocol. It must be different
  # from the legacy private key.
  private_key_path: /var/lib/headscale/noise_private.key

# List of IP prefixes to allocate tailaddresses from.
# Each prefix consists of either an IPv4 or IPv6 address,
# and the associated prefix length, delimited by a slash.
# It must be within IP ranges supported by the Tailscale
# client - i.e., subnets of 100.64.0.0/10 and fd7a:115c:a1e0::/48.
# See below:
# IPv6: https://github.com/tailscale/tailscale/blob/22ebb25e833264f58d7c3f534a8b166894a89536/net/tsaddr/tsaddr.go#LL81C52-L81C71
# IPv4: https://github.com/tailscale/tailscale/blob/22ebb25e833264f58d7c3f534a8b166894a89536/net/tsaddr/tsaddr.go#L33
# Any other range is NOT supported, and it will cause unexpected issues.
ip_prefixes:
  - fd7a:115c:a1e0::/48
  - 100.64.0.0/10 # you can change this value to any private ip range you want.

# --------------------------------------------------------------------------
#             Nothing else below this point needs to be changed right now
# --------------------------------------------------------------------------

# DERP is a relay system that Tailscale uses when a direct
# connection cannot be established.
# https://tailscale.com/blog/how-tailscale-works/#encrypted-tcp-relays-derp
#
# headscale needs a list of DERP servers that can be presented
# to the clients.
derp:
  server:
    # If enabled, runs the embedded DERP server and merges it into the rest of the DERP config
    # The Headscale server_url defined above MUST be using https, DERP requires TLS to be in place
    enabled: false

    # Region ID to use for the embedded DERP server.
    # The local DERP prevails if the region ID collides with other region ID coming from
    # the regular DERP config.
    region_id: 999

    # Region code and name are displayed in the Tailscale UI to identify a DERP region
    region_code: "headscale"
    region_name: "Headscale Embedded DERP"

    # Listens over UDP at the configured address for STUN connections - to help with NAT traversal.
    # When the embedded DERP server is enabled stun_listen_addr MUST be defined.
    #
    # For more details on how this works, check this great article: https://tailscale.com/blog/how-tailscale-works/
    stun_listen_addr: "0.0.0.0:3478"

  # List of externally available DERP maps encoded in JSON
  urls:
    - https://controlplane.tailscale.com/derpmap/default

  # Locally available DERP map files encoded in YAML
  #
  # This option is mostly interesting for people hosting
  # their own DERP servers:
  # https://tailscale.com/kb/1118/custom-derp-servers/
  #
  # paths:
  #   - /etc/headscale/derp-example.yaml
  paths: []

  # If enabled, a worker will be set up to periodically
  # refresh the given sources and update the derpmap
  # will be set up.
  auto_update_enabled: true

  # How often should we check for DERP updates?
  update_frequency: 24h

# Disables the automatic check for headscale updates on startup
disable_check_updates: false

# Time before an inactive ephemeral node is deleted?
ephemeral_node_inactivity_timeout: 30m

# Period to check for node updates within the tailnet. A value too low will severely affect
# CPU consumption of Headscale. A value too high (over 60s) will cause problems
# for the nodes, as they won't get updates or keep alive messages frequently enough.
# In case of doubts, do not touch the default 10s.
node_update_check_interval: 10s

# SQLite config
db_type: sqlite3

# For production:
db_path: /var/lib/headscale/db.sqlite

# # Postgres config
# If using a Unix socket to connect to Postgres, set the socket path in the 'host' field and leave 'port' blank.
# db_type: postgres
# db_host: localhost
# db_port: 5432
# db_name: headscale
# db_user: foo
# db_pass: bar

# If other 'sslmode' is required instead of 'require(true)' and 'disabled(false)', set the 'sslmode' you need
# in the 'db_ssl' field. Refers to https://www.postgresql.org/docs/current/libpq-ssl.html Table 34.1.
# db_ssl: false

### TLS configuration
#
## Let's encrypt / ACME
#
# headscale supports automatically requesting and setting up
# TLS for a domain with Let's Encrypt.
#
# URL to ACME directory
acme_url: https://acme-v02.api.letsencrypt.org/directory

# Email to register with ACME provider
acme_email: ""

# Domain name to request a TLS certificate for:
tls_letsencrypt_hostname: ""

# Path to store certificates and metadata needed by
# letsencrypt
# For production:
tls_letsencrypt_cache_dir: /var/lib/headscale/cache

# Type of ACME challenge to use, currently supported types:
# HTTP-01 or TLS-ALPN-01
# See [docs/tls.md](docs/tls.md) for more information
tls_letsencrypt_challenge_type: HTTP-01
# When HTTP-01 challenge is chosen, letsencrypt must set up a
# verification endpoint, and it will be listening on:
# :http = port 80
tls_letsencrypt_listen: ":http"

## Use already defined certificates:
tls_cert_path: ""
tls_key_path: ""

log:
  # Output formatting for logs: text or json
  format: text
  level: info

# Path to a file containg ACL policies.
# ACLs can be defined as YAML or HUJSON.
# https://tailscale.com/kb/1018/acls/
acl_policy_path: ""

## DNS
#
# headscale supports Tailscale's DNS configuration and MagicDNS.
# Please have a look to their KB to better understand the concepts:
#
# - https://tailscale.com/kb/1054/dns/
# - https://tailscale.com/kb/1081/magicdns/
# - https://tailscale.com/blog/2021-09-private-dns-with-magicdns/
#
dns_config:
  # Whether to prefer using Headscale provided DNS or use local.
  override_local_dns: true

  # List of DNS servers to expose to clients.
  nameservers:
    - 1.1.1.1

  # NextDNS (see https://tailscale.com/kb/1218/nextdns/).
  # "abc123" is example NextDNS ID, replace with yours.
  #
  # With metadata sharing:
  # nameservers:
  #   - https://dns.nextdns.io/abc123
  #
  # Without metadata sharing:
  # nameservers:
  #   - 2a07:a8c0::ab:c123
  #   - 2a07:a8c1::ab:c123

  # Split DNS (see https://tailscale.com/kb/1054/dns/),
  # list of search domains and the DNS to query for each one.
  #
  # restricted_nameservers:
  #   foo.bar.com:
  #     - 1.1.1.1
  #   darp.headscale.net:
  #     - 1.1.1.1
  #     - 8.8.8.8

  # Search domains to inject.
  domains: []

  # Extra DNS records
  # so far only A-records are supported (on the tailscale side)
  # See https://github.com/juanfont/headscale/blob/main/docs/dns-records.md#Limitations
  # extra_records:
  #   - name: "grafana.myvpn.example.com"
  #     type: "A"
  #     value: "100.64.0.3"
  #
  #   # you can also put it in one line
  #   - { name: "prometheus.myvpn.example.com", type: "A", value: "100.64.0.3" }

  # Whether to use [MagicDNS](https://tailscale.com/kb/1081/magicdns/).
  # Only works if there is at least a nameserver defined.
  magic_dns: true

  # Defines the base domain to create the hostnames for MagicDNS.
  # `base_domain` must be a FQDNs, without the trailing dot.
  # The FQDN of the hosts will be
  # `hostname.user.base_domain` (e.g., _myhost.myuser.example.com_).
  base_domain: example.com

# Unix socket used for the CLI to connect without authentication
# Note: for production you will want to set this to something like:
unix_socket: /var/run/headscale/headscale.sock
unix_socket_permission: "0770"
#
# headscale supports experimental OpenID connect support,
# it is still being tested and might have some bugs, please
# help us test it.
# OpenID Connect
# oidc:
#   only_start_if_oidc_is_available: true
#   issuer: "https://your-oidc.issuer.com/path"
#   client_id: "your-oidc-client-id"
#   client_secret: "your-oidc-client-secret"
#   # Alternatively, set `client_secret_path` to read the secret from the file.
#   # It resolves environment variables, making integration to systemd's
#   # `LoadCredential` straightforward:
#   client_secret_path: "${CREDENTIALS_DIRECTORY}/oidc_client_secret"
#   # client_secret and client_secret_path are mutually exclusive.
#
#   # The amount of time from a node is authenticated with OpenID until it
#   # expires and needs to reauthenticate.
#   # Setting the value to "0" will mean no expiry.
#   expiry: 180d
#
#   # Use the expiry from the token received from OpenID when the user logged
#   # in, this will typically lead to frequent need to reauthenticate and should
#   # only been enabled if you know what you are doing.
#   # Note: enabling this will cause `oidc.expiry` to be ignored.
#   use_expiry_from_token: false
#
#   # Customize the scopes used in the OIDC flow, defaults to "openid", "profile" and "email" and add custom query
#   # parameters to the Authorize Endpoint request. Scopes default to "openid", "profile" and "email".
#
#   scope: ["openid", "profile", "email", "custom"]
#   extra_params:
#     domain_hint: example.com
#
#   # List allowed principal domains and/or users. If an authenticated user's domain is not in this list, the
#   # authentication request will be rejected.
#
#   allowed_domains:
#     - example.com
#   # Note: Groups from keycloak have a leading '/'
#   allowed_groups:
#     - /headscale
#   allowed_users:
#     - alice@example.com
#
#   # If `strip_email_domain` is set to `true`, the domain part of the username email address will be removed.
#   # This will transform `first-name.last-name@example.com` to the user `first-name.last-name`
#   # If `strip_email_domain` is set to `false` the domain part will NOT be removed resulting to the following
#   user: `first-name.last-name.example.com`
#
#   strip_email_domain: true

# Logtail configuration
# Logtail is Tailscales logging and auditing infrastructure, it allows the control panel
# to instruct tailscale nodes to log their activity to a remote server.
logtail:
  # Enable logtail for this headscales clients.
  # As there is currently no support for overriding the log server in headscale, this is
  # disabled by default. Enabling this will make your clients send logs to Tailscale Inc.
  enabled: false

# Enabling this option makes devices prefer a random port for WireGuard traffic over the
# default static port 41641. This option is intended as a workaround for some buggy
# firewall devices. See https://tailscale.com/kb/1181/firewalls/ for more information.
randomize_client_port: false
Setup the Headscale Docker Compose
After you've setup your Headscale configuration file, you'll need the docker-compose.yml file ready to pull the server image and create the container.
version: '3.5'
services:
  headscale:
    image: headscale/headscale:latest
    volumes:
      - ./config:/etc/headscale/
      - ./data:/var/lib/headscale
    ports:
      - 27896:8080
    command: headscale serve
    restart: unless-stopped
In the docker-compose file, you'll see two mapped volumes. The first, ./config you need to ensure has the config.yaml file in it before you try to bring up the headscale server.
Once you've setup your config.yaml file, you'll be ready to bring up the headscale server.
docker compose up -d
You can monitor the logs with the command
docker compose logs -f
Add Users and Nodes to your Headscale VPN
Once the server is up and running, you need to create a user. A user can have multiple devices assigned to him / her.
docker-compose exec headscale headscale users create <some name>
The normal command for a non-dockerized Headscale would be
headscale users create <some name>
In this case we have Headscale running in Docker, so we first tell docker to use our either our "headscale" service, or our "headscale-headscale-1" container in which to run the command. Next we give it the actual command line command, options, and arguments.
Now that you've added a user, you can assign devices to that user, and use the open source Tailscale client applications to connect to your self hosted Headscale server.
For Linux, you can download and install the Tailscale client with a single command:
curl -fsSL https://tailscale.com/install.sh | sh
Once the Tailscale client is installed on a client device, we need to next, on the server, create a key for our first device using the command line.
docker-compose exec headscale headscale preauthkeys create -e 48h -u brian
This will give you a key that is valid to use to register a device. The key is valid for a period of 48 hours. If you want more time, change the number before the “h” in the command. (e.g. instead of 48h, you can put 12h for 12 hours).
Now, we'll use the Tailscale CLI (Command Line Interface) to add our client to our Headscale server using the key we just generated on the server.
sudo tailscale up --login-server https://headscale.yourdomain.org --authkey <paste your super long strong key here>
Where the value after --login-server is the secure URL of your server, and the value after --authkey is the key you generated from your Headscale server.
Voila! You now have your first client added to your Headscale / WIreguard VPN.
Why isn't there a GUI?
Actually, there are a few different web graphical user interfaces (GUIs) to choose from. If you prefer a GUI for managing your server, then let's add one.
Back on your server, get into your “docker/headscale” folder, and open the docker-compose.yml" file.
cd ~/docker/headscale
nano docker-compose.yml
We'll be adding a new section below our server information in the existing file that will bring up our web ui.
  headscale-webui:
    image: ghcr.io/ifargle/headscale-webui:latest
    container_name: headscale-webui
    environment:
      - TZ=America/Chicago
      - PGID=1000
      - PUID=1000
      - COLOR=blue                              # Use the base colors (ie, no darken-3, etc) -
      - HS_SERVER=https://headscale.yourdomain.org    # Reachable endpoint for your Headscale server
      - DOMAIN_NAME=https://headscale.yourdomain.org  # The base domain name for this container.
      - SCRIPT_NAME=/admin                     # This is your applications base path (wsgi requires the name "SCRIPT_NAME").  Remove if you are hosing at the root /
      - KEY="a-really-long-key-you-create-with-the-command-in-the-comment"             # Generate with "openssl rand -base64 32" - used to encrypt your key on disk.
      - AUTH_TYPE=Basic                        # AUTH_TYPE is either Basic or OIDC.  Empty for no authentication
      - LOG_LEVEL=info                         # Log level.  "DEBUG", "ERROR", "WARNING", or "INFO".  Default "INFO"
      # ENV for Basic Auth (Used only if AUTH_TYPE is "Basic").  Can be omitted if you aren't using Basic Auth
      - BASIC_AUTH_USER=youruser                   # Used for basic auth
      - BASIC_AUTH_PASS=some-long-str0n6-pa66word4                  # Used for basic auth
      # ENV for OIDC (Used only if AUTH_TYPE is "OIDC").  Can be omitted if you aren't using OIDC
      #- OIDC_AUTH_URL=https://yourauthserver.com/application/o/headscale/.well-known/openid-configuration # URL for your OIDC issuer's well-known endpoint
      #- OIDC_CLIENT_ID=your-auth-server-client-id-info-here         # Your OIDC Issuer's Client ID for Headscale-WebUI
      #- OIDC_CLIENT_SECRET=your-oidc-auth-server-client-secret-key-will-go-here-and-be-very-long-indeed      # Your OIDC Issuer's Secret Key for Headscale-WebUI
    ports:
      - 5000:5000
    volumes:
      - ./volume:/data                         # Headscale-WebUI's storage.  Make sure ./volume is readable by UID 1000 (chown 1000:1000 ./volume)
      - ./config/:/etc/headscale/:ro           # Headscale's config storage location.  Used to read your Headscale config.
In this section, I am forwarding port 9443 on the host machine to port 443 on the container. You can change the value of 9443 to any open port on your host machine, but please don't use a port that is reserved for standard protocols (80, 8080 http traffic / 22, 2222 SSH traffic, etc).
Save the file with CTRL + O, then press enter to confirm. The file should look like this:
version: '3.5'
services:
  headscale:
    image: headscale/headscale:latest
    volumes:
      - ./config:/etc/headscale/
      - ./data:/var/lib/headscale
    ports:
      - 27896:8080
    command: headscale serve
    restart: unless-stopped

  headscale-webui:
    image: ghcr.io/ifargle/headscale-webui:latest
    container_name: headscale-webui
    environment:
      - TZ=America/Chicago
      - PGID=1000
      - PUID=1000
      - COLOR=blue                              # Use the base colors (ie, no darken-3, etc) -
      - HS_SERVER=https://headscale.yourdomain.org    # Reachable endpoint for your Headscale server
      - DOMAIN_NAME=https://headscale.yourdomain.org  # The base domain name for this container.
      - SCRIPT_NAME=/admin                     # This is your applications base path (wsgi requires the name "SCRIPT_NAME").  Remove if you are hosing at the root /
      - KEY="a-really-long-key-you-create-with-the-command-in-the-comment"             # Generate with "openssl rand -base64 32" - used to encrypt your key on disk.
      - AUTH_TYPE=Basic                        # AUTH_TYPE is either Basic or OIDC.  Empty for no authentication
      - LOG_LEVEL=info                         # Log level.  "DEBUG", "ERROR", "WARNING", or "INFO".  Default "INFO"
      # ENV for Basic Auth (Used only if AUTH_TYPE is "Basic").  Can be omitted if you aren't using Basic Auth
      - BASIC_AUTH_USER=youruser                   # Used for basic auth
      - BASIC_AUTH_PASS=some-long-str0n6-pa66word4                  # Used for basic auth
      # ENV for OIDC (Used only if AUTH_TYPE is "OIDC").  Can be omitted if you aren't using OIDC
      #- OIDC_AUTH_URL=https://yourauthserver.com/application/o/headscale/.well-known/openid-configuration # URL for your OIDC issuer's well-known endpoint
      #- OIDC_CLIENT_ID=your-auth-server-client-id-info-here         # Your OIDC Issuer's Client ID for Headscale-WebUI
      #- OIDC_CLIENT_SECRET=your-oidc-auth-server-client-secret-key-will-go-here-and-be-very-long-indeed      # Your OIDC Issuer's Secret Key for Headscale-WebUI
    ports:
      - 5000:5000
    volumes:
      - ./volume:/data                         # Headscale-WebUI's storage.  Make sure ./volume is readable by UID 1000 (chown 1000:1000 ./volume)
      - ./config/:/etc/headscale/:ro           # Headscale's config storage location.  Used to read your Headscale config.
Double check that everything looks correct, keeping in mind that yaml is space dependent.
Once you are confident in the file configuration, you can save with CTRL + O, thenpress Enter to confirm, and exit the file with CTRL + X.
Before we bring up our new system. We need to create our reverse proxy setup. I use NGinX Proxy Manager, but you may use any reverse proxy you like.
In NPM (NGinX Proxy Manager) go to your Proxy Hosts page, and add a new host.
in the URL enter the name you'd like devices to connect to your Headscale from. I used "headscale.routemhome.org", then press Tab or Enter to keep that entry.
Note:
1. I own the domain routemehome.org.
2. I have an A-record in the domain DNS set to point to my public IP address.
3. I have my firewall setup to forward traffic on ports 80 and 443 to the host where I run NGINX Proxy Manager.
- In the IP address field, enter either:
- The private IP of the host where Headscale is running (if it's on a different host than NGinX Proxy Manager).
- “localhost” if Headscale is running on the same host as NGinX Proxy Manager.
- In the Port field, Enter the port number you mapped in the first section for Headscale. In my example above is 27896.
- Tick the options for “Block Common Exploits” and “Websocket Support”.
- Now move to the SSL tab. Select the option “Request a new Certificate” from the drop-down box.
- Tick the box for “Force SSL” and "HTTP/2 Support".
- Make sure you email is filled in on the field shown, then tick the option for “Accept the LetsEncrypt TOS”.
- Click Save.
- It may take a few seconds to a minute, but if everything is setup correctly, the pop-up will go away. You should now see your Headscale URL listed, and to the right it should say LetsEncrypt.
Now, we need to pull down the Headscale Web UI portion. In the terminal, you'll want to type:
docker compose pull
This will pull down the docker image for headscale-webui.
After it's done, you'll need to run
docker compose up -d
This will bring up the headscale-web-ui container.
Now we need to modify our NPM entry one more time. In NPM find the line for your headscale entry, and click the 3-dot icon on the right end of that row. Select ‘Edit’ from the options.
Move to the ‘Custom Locations’ tab, and click the ‘Add Location’ button.
In the “Location” field, we'll add the text /admin.
Next, enter the same IP on this page as you did on the main page for this entry. Now enter the port you mapped for the host in the headscale-web-ui section of the docker compose. In the example above this would be 5000.
Click ‘Save’.
Now you should be able to visit your Headscale URL with the /admin on then end, and see the headscale web ui.
In my case I would visit https://headscale.routemehome.org/admin
When it first loads you'll see a space to enter an API key. This is because we need to generate an API key for the web ui to use.
In the terminal on the Headscale server you'll want to run the command:
docker exec headscale-headscale-1 headscale apikeys create
The command on a non-docker install would be:
headscale apikeys create
Take the API key that is output to the terminal, and copy it.
Go back to your headscale-web-ui page, and paste in the API key you just generated. Click ‘Save’. You should see a check mark to the right of the row of buttons, but if not, click the ‘Test API’ button and see if it shows up.
If everything went well, you can now view, create, and delete users and devices from the web user interface.
Is there a Linux GUI for the Desktop Clients?
There is a really great open source application called "Trayscale". This application gives almost the exact same options / experience as the Windows / MacOS Tailscale GUI made by Tailscale.
You need to first install the Tailscale client on your Linux Desktop using the one-liner command above, or using your package manager for your distro. The one-liner (for convenience) is again:
curl -fsSL https://tailscale.com/install.sh | sh
Once that's installed, you'll want to make your user an operator in Tailscale.
sudo tailscale set --operator=$USER
Now, you can install Trayscale from Flathub with the command:
flatpak install flathub dev.deedles.Trayscale
flatpak install flathub dev.deedles.Trayscale
flatpak install flathub dev.deedles.Trayscale
This, of course depends on you having installed Flatpak for your distro, as well as setting up Flathub as a repo for Flatpak. You can search the web and find many results on how to do that for your specific distro.
Once installed, start Trayscale, and you should see your various devices (including the one you are using, on the left, and clicking on each device will give actions / information in the right pane.
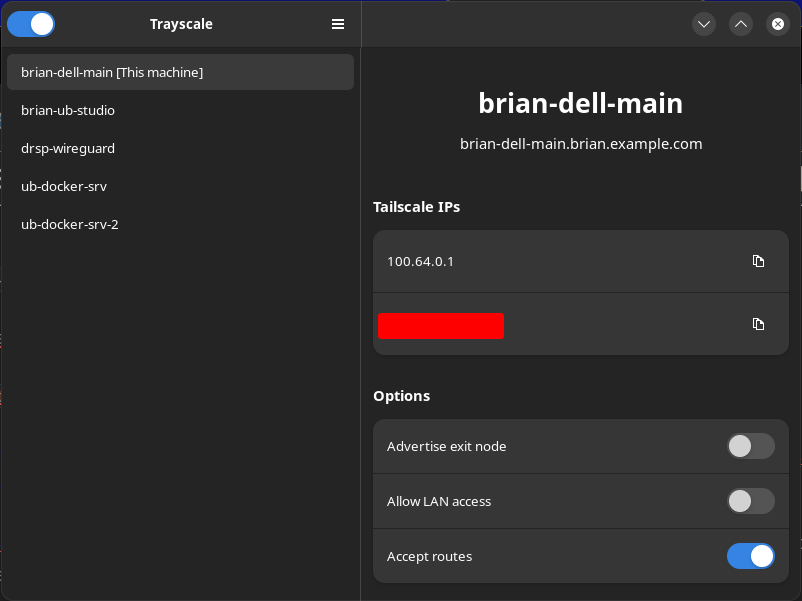
That's it. Trayscale is now up and running on your desktop device. When you close it, it will be minimized to your system tray.
I want to access a LAN through my Headscale Node on that Network
This is something called Subnet Routing in the Tailscale / Headscale world. In this case you want to create a subnet route from your wireguard network into the LAN so you can access all of the machines on that LAN without having to put the Tailscale client on every machine.
Tailscale highly recommends putting the client on each device whenever possible as this yields overall better connectivity and performance.
Sometimes, however, this simply isn't possible. Printers, PBX Phones, and other devices with a build in OS that can't be (easily) modified or updated may not be able to have the Tailscale client installed, so accessing these devices remotely is useful through a Subnet Route.
I showed you haw to do this with Netmaker a while back, and it was admittedly much easier in Netmaker to accomplish this. You simply created an “egress” node from one of the machines connected via the Netmaker netclient, and told it what subnet you wanted access to, and submitted in the web UI, and BOOM! Done.
With Headscale / Tailscale it's a bit more involved.
First, we need to define a node as our subnet router and tell the node to advertise itself that way to the other nodes on the Headscale network. Next, we need to tell the Headscale server that the node is now defined as a router, and enable that route in the Headscale server. Finally, we need to tell each client node we want to have access to that route that it is able to access that route.
Yeah, it's kind of a lot, but not too horrible in the end.
- Enable IP Forwarding on the node that will be the subnet router.
- Advertise the Routes on the node you want to allow (the subnet you want to allow access to).
- List the routes on the Headscale server to make sure they are being advertised
- Enable the routes on the Headscale server (by default they are not enabled)
- Accept the routes on the clients you want to allow to access the subnet.
Let's get started.
Enable IP Forwarding
This method will vary depending on your Linux distribution, so please check their documentation as well, and always check the Tailscale docs to make sure you are aware of any updates.
echo 'net.ipv4.ip_forward = 1' | sudo tee -a /etc/sysctl.conf
echo 'net.ipv6.conf.all.forwarding = 1' | sudo tee -a /etc/sysctl.conf
sudo sysctl -p /etc/sysctl.conf
Advertise the Subnet Route(s) on the Node
sudo tailscale up --advertise-routes 192.168.1.0/24 --login-server https://headscale.yourdomain.org
In the above, you would of course replace the IP subnet with the subnet you want to be able to reach, and the login server URL with your headscale server URL.
List the Routes on your Headscale Server
docker exec headscale-headscale-1 headscale routes list node-name
In the above command, change node-name to the actual name of your tailscale node.
You can alternatively list all headscale routes with:
docker exec headscale-headscale-1 headscale routes list
You should see something like this, either way:
ID | Machine        | Prefix          | Advertised | Enabled | Primary
1  | my-great-node  | 192.168.1.0/24  | true       | false    | false
Notice that the route shows “Advertised”, but is showing false for “Enabled” and “Primary”. We need to enable the route on our headscale server now.
Enable the Route on the Headscale Server
docker exec headscale-headscale-1 headscale routes enable my-great-node -r 1 192.168.16.0/24
The formulaic version of the above command is:
docker exec <docker container name> headscale routes enable <node-name> -r <route id> <subnet IP>
From our listing of the advertised routes, we can see that the node name we want is “my-great-node”, and we can get the route ID, which is “1”, and the subnet we want to enable it for is “192.168.1.0/24”.
Now if you list the routes again, you should see something like
ID | Machine        | Prefix          | Advertised | Enabled | Primary
1  | my-great-node  | 192.168.1.0/24  | true       | true    | true
Though, depending on how many subnets you set on a node, Primary may say “true” or “false”. As long as it's enabled, that's what we are looking for.
Accept the Route on the Client
From the other client nodes, you need to accept the routes in order to use them. A bit tedious, but not terrible on a small network. I'm sure there's an easier way to do it, but this is what I've got for now.
sudo tailscale up --accept-routes --login-server=https://headscale.yourdomain.org
You can, alternatively tick the switch on the Trayscale UI to accept routes on the client as well.
Now, you can test your access by pinging a machine on the routed subnet network. If everything worked without errors, you should be ready to access those network devices remotely.
Support My Channel and Content
Support my Channel and ongoing efforts through Patreon:
https://www.patreon.com/awesomeopensource
No comments to display
No comments to display