Setting up a Remote Access Wireguard VPN with Netmaker
In Business, or home use, networking is often a very tough nut to crack. In today's world, where we choose privacy over convenience, the search continues for solutions to help us have a seamless experience in accessing our data, applications, system, and media. I've done literally hundreds of videos on so many amazing applications, but at the end of the day it all comes down to access. We want to have access to our systems regardless of where we are in the world.
Netmaker is an absolute beast of a tool that provides exactly what we are all looking for. It runs on top of the very secure, very fast, Wireguard protocol. This means we can setup a cloud based network, but make it feel like we are right there at our office, or in our home on the local network. The little bit of what I'll discuss in this post, and demonstrate to you in the video is just the tip of the metaphorical iceberg. The limitations are only what you can think up for your networking needs. But tools like Netmaker are what make open source such a valuable asset.
Installation
What we'll cover today
- How to install the Netmaker server, and create a network.
- How to install the Netmaker Client and join a network.
- How to setup Ingress and Egress nodes (and what those are).
- How to setup external clients (and what that means)
- How to connect back to our Local Area Network without opening any firewall ports.
What you'll need
- A server with a static public IP address. (I used a Digital Ocean droplet with 1 vCPU and 1 GB RAM)
- A machine inside our Local Area network that we can use as a gateway device on our Wireguard network.
- A machine we want to connect to our LAN from outside (a smart phone, tablet, laptop, or even a machine on another network somewhere).
- Preferably a Domain name that you own, and can add a subdomain and A-record DNS entry for.
- Docker and Docker-Compose on our server.
- About 30 minutes of time.
Installing the Server
As always, I highly recommend that you follow the instructions on the netmaker site for server installation, as this will be the most up to date method based on version. As of the making of this article and accompanying video, Netmaker is on version 0.16.0. You can find their instructions for installation here.
First, we'll need a server (netmaker is known to run well on Ubuntu servers, so I made mine 22.04) to install the Netmaker server on. I highly recommend setting this up on a ninexpensive VPS. If you use my Digital Ocean link you can sign up for a 60 Day / $200.00 US trial. Which means you'll pay nothing for the first 2 months of the $6 server we'll use for this purpose. That said, feel free to use a server on Linode, Vultr, Hertzner, or whoever you prefer.
NOTE: The Netmaker folks have identified issues with using the Oracle Cloud Free Tier server for Wireguard in general, and do not suggest you use that service for this purpose.
When you've got your server created, you'll get a public IPv4 IP address assigned to it. You'll want to get that IPv4 address, and create an A-record for a subdomain on a domain that you own. I own the domain "theitpros.org", so I setup an A-record in my registrar's DNS settings to point the subdomain of "*.netmaker.theitpros.org" to my public IPv4 address. You should do something similar, with your domain. Create an A-record for "*.netmaker.<your-super-domain>" pointing to your server's IPv4 address.
Next, you'll need to install Docker and Docker-Compose. In the Netmaker instructions they give you a single command to install docker.io, docker-compose, and Wireguard on a server. I however, prefer to use Docker-CE to docker.io. It's completely up to you, and the system works with either one.
Follow these steps to install Docker-CE and Docker-Compose using my method:
wget https://gitlab.com/bmcgonag/docker_installs/-/raw/main/install_docker_nproxyman.shNext, change the permissions on the downloaded file:
chmod +x install_docker_nproxyman.sh
And run the script with:
./install_docker_nproxyman.sh
Now, select your base OS by number. Next, you need to answer "y" to the first two questions about installing Docker-CE and Docker-Compose. Feel free to answer "n" to the other questions. The script will attempt to update and upgrade your install first.
Next, install Wireguard with one of the following commands:
Ubuntu:
sudo apt install wireguard -y
Fedora
sudo dnf install wireguard-tools -y
Arch
sudo pacman -S wireguard-tools
Please run any upgrades before running the script, as many VPS upgrades will show a prompt that my script down not display.
After the script completes, you can continue with the installation of Netmaker.
If you have a firewall enabled in front of your chosen server, you'll need to open a few ports to allow Wireguard traffic to flow (this is why we want this installed in a VPS).
Open Ports:
- 443 (TCP)
- 51821-51899 (UDP) You can make this range smaller, but if you want to eventually setup more than one network, you'll want to have a port for each network to run on.
sudo ufw allow proto tcp from any to any port 443 && sudo ufw allow 51821:51830/udp
iptables --policy FORWARD ACCEPT
Next, you'll get your docker-compose.yml file ready. First run the command:
ip route get 1 | sed -n 's/^.*src \([0-9.]*\) .*$/\1/p'
The following lines will pull down the docker-compose.yml file that's already prepared, from the Netmaker repository. After that you'll replace the parts surrounded with angle-brackets "<" and ">" with your actual base subdomain (mine was "netmaker.theitpros.org"). You'll need to replace the angle-brackets themselves as well. For IP, put the public IPv4 address you received for your server. For email, you can use any email you want.
wget -O docker-compose.yml https://raw.githubusercontent.com/gravitl/netmaker/master/compose/docker-compose.yml
sed -i 's/NETMAKER_BASE_DOMAIN/<your base domain>/g' docker-compose.yml
sed -i 's/SERVER_PUBLIC_IP/<your server ip>/g' docker-compose.yml
sed -i 's/YOUR_EMAIL/<your email>/g' docker-compose.yml
Next, we'll create a secret key value for our server as well.
tr -dc A-Za-z0-9 </dev/urandom | head -c 30 ; echo ''
And now we'll place that key value into the docker-compose file using the same method as the commands above. Replace the value with the angle brackets, including the angle-brackets themselves, with the actual key value.
sed -i 's/REPLACE_MASTER_KEY/<your generated key>/g' docker-compose.yml
Now we need to download one more file. The last file we need is a Mosquitto (MQTT Server) file. Mosquitto is a message queue server application. This is the software that allows messages to be sent and recieved on a network, and is part of how netmaker keeps your client machines in sync.
wget -O /root/mosquitto.conf https://raw.githubusercontent.com/gravitl/netmaker/master/docker/mosquitto.conf
NOTE: After version 0.16.1, you'll need to do two more steps.
1. Cretae a unique, strong password for the Mosquitto configuration file, and add it to the docker-compose.
2. Download a "wait" script, for use on the server.
The commands for these 2 steps are:
sed -i "s/REPLACE_MQ_ADMIN_PASSWORD/<mqtt admin password>/g" docker-compose.ymlWhere you'll replace the the angle-brackets and information between them with a password of your creation.
wget -q -O /root/wait.sh https://raw.githubusercontent.com/gravitl/netmaker/develop/docker/wait.sh
chmod +x wait.sh
We are now ready to start the Netmaker server with the following command:
sudo docker-compose up -d
Once the images have all been pulled down, and you have started your containers (you see 'done' in the command line for all containers, and you are back at the prompt), you'll want to open your favorite modern browser of choice, and navigate to the address:
https://dashboard.netmaker.<your super domain>
In my case, I went to
https://dashboard.netmaker.theitpros.org
Once at your new domain, you'll be prompted to create an account. Enter an email you want, doesn't have to be the same as the one you put in the docker-compose file, and a strong password.
Once saved, you'll be taken to the login screen. Lovin, and you'll see your Netmaker dashboard.
Create a Network
Now, you'll want to create a network in Netmaker. Click the 'Networks' tile on the dashboard, or in the left navigation panel click 'Networks'.
On the Networks screen, you'll want to click on the 'Create Network' button.
In the subsequent form, give you network a name, and then enter a private IP address and range in CIDR notation, you'd like for the network. Alternatively, there is an 'Autofill' button you can click, and then change the name, or network IP generated by the autofill option.
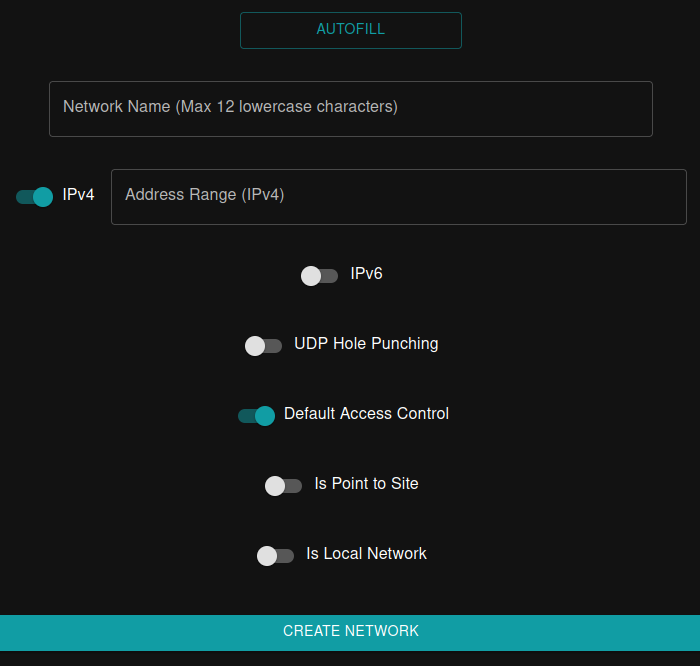
Next, select whether to add IPv6, and whether you want UDP hole punching to be enabled. UDP hole punching can be usefule, but is not always necessary. If you leave it off, and later determine you want to enable it, you can edit the network.
Finally, after selecting the options you want, click 'Create Network'.
You new network will be created if you have entered a name that is 12 characters or less, and have not tried to enter an improper IP address and / or range.
Netmaker Client Installation
Now that you have a Wireguard server in the cloud, running Netmaker, you'll likely want to connect a machine or 50 to the network. The easiest way with the most benefits is to use the Netmaker client. This is a tool you install on any machine / device that you want to be able to connect to the Netmaker network / server you just created. There are clients for MacOS, Linux, BSD, and yes...even Windows. There is also a graphical client (GUI) which is installed by default on Windows and MacOS, but is a separate install for Linux / BSD. You can download the GUI for Linux and BSD on their Github releases page.
To avoid causing issues, I will only provide the link to the client install page. There are instructions for many different distributions there, and as those change, I don't want my documentation to give bad information. Please go to the official Netmaker documentation pages for the proper installation instruction of the Netclient.
Once you have the Netclient installed, you'll want to go back to your Web Admin page, and go to "Access Keys" in the dashboard or left navigation.
Once in Access Keys, select the network you'd like to add a node for.
You can add multiple networks in Netmaker, and add nodes to each network individually. A single machine can be a node on multiple networks by using the Netclient to join those networks.
Then click Create Access Key.

Next, increase the number of access keys. You can use an access key more than once. You could provide Fred an access key for his Laptop, Desktop, and CI Server. You only need to create once access key for Fred, but allocate it for three (3) uses.

Now click the 'Create' button.
You'll see a bunch of different lines with options for adding the key to various nodes.

Don't worry, the example join above isn't functional anymore.
Now, you'll paste this into the terminal of your desired client, and be joined to the network. You should now be able to ping the IP of your server machine, and any other peer machines on the network. If you have trouble joining with the Netclient, you can start through any troubleshooting steps in the Netmaker documentation, and you can always jump over to their Discord server to ask for help as well.
Ingress and Egress Nodes
The terminology is set from the perspective of the internet to the Netmaker netwrok. Ingress, meaning to come into, or a path inward is therefore indicative of a node that has been setup and identified as a method for an external client to connect the Network (we'll cover connecting external clients in the next section). Egress, means a point where the client machine can exit the Netmaker network, and go into another network such as a LAN inside your home or business.
What we want to setup is a network where we have an external client or netclient node external to our LAN, that can then successfully get back into our LAN via our Netmaker network, and access our various servers / machines / services inside the LAN.
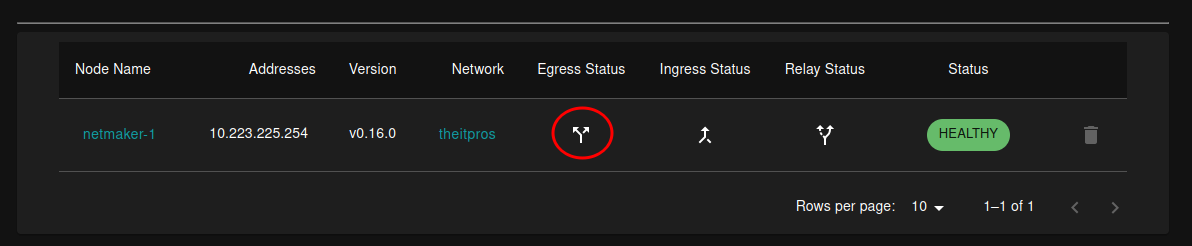
In order to set this up, we'll need to first identify an Egress Node. Inside our Local Area Network, we'll install the Netclient, and join our Netmaker Network with it. You'll be able to see the node show up in the Netmaker Web Admin panel on the 'Nodes' view.
Next to this node, you'll see several icons. One is in the column form Egress. Click this corresponding icon,
You'll be prompted for two pieces of information.
1. The network interface you'll be using as the Egress point. You can find your network information from the command line with the command:
ip -br -c a
2. The IP address range in CIDR notation, you want give access to on this network. In my case, my network is 192.168.10.x, so to give an external device access to the whole network, I would make the entry be
192.168.10.0/24
Now click on Create Egress. You should see the double arrow icon turn into a check mark for that node.
With your Egress gateway defined, you should now be able to ping any machine that can respond to ping requests that resides inside you selected LAN, from outside that LAN.
Next, we'll create an Ingress node. You generally don't want this to be the same node as your egress node, but it can be done. I simply setup my main Netmaker server node as my Ingress node. An ingress node is used to allow an "external" client into the netmaker network. Some machines / devices won't be running the Netclient, but fear not! These devices can still run Wireguard, and connect to the network using the External Client configuration file that can be generated in the server. Then simply use the wireguard app on mobile devices, or the CLI or a graphical Wireguard tool to connect these devices to your Netmaker networks.
Before you can create any external client configurations, you need to define an "Ingress" node. So, let's just use our Netmaker server for this...but note that any host that is reachable by a device can be used, but a public, static IP is preferred for this purpose.
In your 'Nodes' view, find your Netmaker server, and click the icon in its row that is in the "Ingress" column. Accept the prompt, and you should see the double tail icon turn into a check mark. You're done. You can now start creating External Clients.
External Clients
External clients are clients that will not have their setting synced when changes to the networks / other nodes are made. These are clients setup with a static configuration file. These clients will be able to connect to your network, and interact just fine, but don't get any automatic updates from the network. So, when possible, the Netclient (IMO) is a better choice.
Click on the 'External Clients' option from the dashboard, or from the left navigation panel. Select the Network for which you wish to create an external client. On the left side of the interface, you'll see a list of any Ingress nodes you've defined. Click the "+" icon next to the node you want to create external clients for.
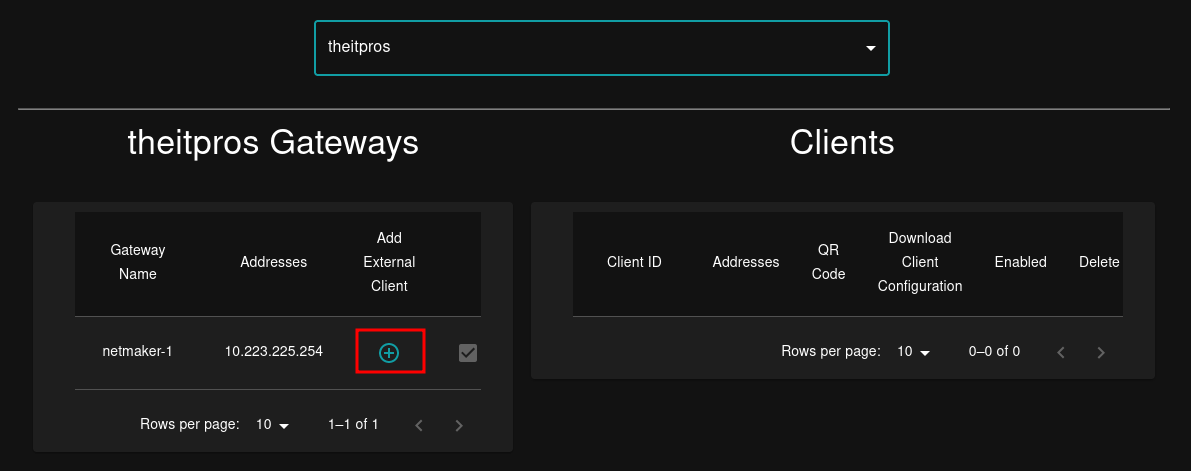
On the right side you'll see External Client configurations being created. Feel free to click the QR Code to expand it onto the screen, or to download the client configuration to your desktop / laptop and use that to connect.
Notice, you can delete a client at any time, and you can remove / disable netclients, and change nodes back from being Egress or Ingress points. You really have total control over your Netmaker network from the ADmin dashboard and tools.
You now have the tools to make all kinds of amazing networks from Netmaker using Wireguard. Go forth, and be awesome!
No comments to display
No comments to display