RustDesk - Open Source Remote Support alternative to AnyDesk, TeamViewer
What Is It?
RustDesk is an open source, remote desktop system that gives you control of your own server, and client software.
If you've ever used TeamViewer, AnyDesk, Remotely, GoToAssist, GoToMyPc, and a whole host of other options, then you'll understand exactly what RustDesk is. It's remote access / remote support software. The beauty of RustDesk is that it's just been re-written, and the server and client are now fully open source, and free to use. This gives you the opportunity to test it out, try it out, and really give it a full go to make sure it will work for you and suit your needs. The control over your own relay / rendezvous server means you control your software end to end. This can help you, and your clients, have more ease of mind about giving you remote access.
Supporting the Project
I try to always mention how to support a project in my videos (though I'm human, and have missed that on occasion), so I thought I would add this section to my template.
It's so very important to the open source world, that we as open source users, enthusiasts, and advocates make sure that we support the projects we get any benefit from. This is what keeps the Open Source projects from being left for dead, defunct, or just unmaintained.
RustDesk uses the Ko-Fi (pronounced coffee) donation system. Please, if you like the software, continue to use the software, or are able to build your businesss through the use of this software, give them a helping hand as well by donating a few dollars each month to sustain the project.
Installation of the Server(s)
What You'll Need
We are going to install RustDesk on a single server today. There are really two server applications taht run for RustDesk to operate. A relay server (which brokers the ability for two systems to connect), and a rendezvous server (which is where the two systems find each other). We'll be running RustDesk servers through Docker and Docker-Compose and they'll run on the same hardware inside of their own Docker Containers. RustDesk (as the name suggests) is built on Rust, and is extremely light on resource needs.
- A home server / machine, or VPS (1GB Ram / 10+ GB HDD / 1 vCPU minimum)
- Docker-CE and Docker-Compose Installed
- (optional) Portainer-CE or Yacht
- (if running from a home server) The ability to forward ports 21115 - 21119
- An A Record or CName Record with a subdomain / domain you want for your Server to run at.
- About 10 minutes of your time.
NOTE: You'll use the same instructions for either a Home Server or VPS other than the port forwarding potentially.
Installing Docker-CE and Docker-Compose
I have a one run script that will help you install Docker-CE and Docker-Compose (as well as Portainer-CE and a few other things if you want them).
To use the script you'll need to have git and curl and wget installed on your server system.
I'm using a Ubuntu VPS server with 1 vCPU, 1 GB RAM, and 25 GB HDD space from Digital Ocean. If you'd like to try out Digital Ocean you can sign up with the link below and get a free $50 credit for 30 days, which would allow you to spin up 10 of these servers I spec'd above in that time.


Let's prepare your system for Docker-CE and Docker-Compose. In your home directory (you can juse use the command cd to get back to your home directory), let's create a new file called "install-docker.sh".
wget -O install-docker.sh https://gitlab.com/bmcgonag/docker_installs/-/raw/main/install_docker_nproxyman.sh
Once downloaded, change the file to have execute permissions with:
chmod +x install-docker.sh
Now you can run the script with the command:
./install-docker.sh
The script will check your current release info and provide you some details to help you choose the right number for your distro. Once you select the number, you may be prompted for your sudo (super user) password to continue.
After that, just enter y for Docker-CE and Docker-Compose, feel free to answer n for the rest of the options.
The script will attempt to update your distro's packages, and this can take a while. If you are using Digital Ocean it is advisable to update the packages, and run the upgrades first as there is a prompt that will cause the install to see to be stuck, you simply won't see the prompt, and it just sits waiting.
To run the updates manually for Ubuntu on Digital Ocean, use the command:
sudo apt update && sudo apt upgrade -y
Let it run, and just tab to the 'Ok' option if prompted at any point, and let the install finish.
Reboot, then run the installer script.
Now Docker-CE and Docker-Compose should both be installed without issue. Your user (that you are logged in with when you run the script) is also added to the docker group by the script.
You can either log out and back in, or try the following commands:
newgrp docker
newgrp
to make it so you don't need to use the sudo permission to execute docker commands.
From this point on I'll assume you've logged out and back in, or done the newgrp commands successfully.
Docker-Compose for RustDesk
Now we'll create a folder structure to help use keep things organized. I like to put all of my docker things inside of a folder called "docker". Then I'll create a new folder inside the docker folder called "rustdesk". You can do this with a single command like this:
mkdir -p ~/docker/rustdesk
This command will create the entire folder structure if need, or will only add the part that's missing (if you already have a docker folder in your home directory).
Move into our new folder:
cd ./docker/rustdesk
Now we'll create a file called "docker-compose.yml". This is a yaml (pronounced yammel) file, and yaml is extremely space dependent. DO NOT use tabs. You want to use spaces, and you want to make sure the indentation is correct.
nano docker-compose.yml
When the editor opens, you'll copy / paste the contents below, then we'll make a few changes for your situation.
version: '3'

networks:
  rustdesk-net:
    external: false

services:
  hbbs:
    container_name: hbbs
    ports:
      - 21115:21115
      - 21116:21116
      - 21116:21116/udp
      - 21118:21118
    image: rustdesk/rustdesk-server:latest
    command: hbbs -r <your-cool.server.com>:21117
    volumes:
      - ./hbbs:/root
    networks:
      - rustdesk-net
    depends_on:
      - hbbr
    restart: unless-stopped

  hbbr:
    container_name: hbbr
    ports:
      - 21117:21117
      - 21119:21119
    image: rustdesk/rustdesk-server:latest
    command: hbbr
    volumes:
      - ./hbbr:/root
    networks:
      - rustdesk-net
    restart: unless-stopped
To paste in the nano editor, you can use a right-click then select "paste" from the pop-up menu, or you can use teh hotkey combo of CTRL + Shift + V.
Once pasted, you'll want to change the line
command: hbbs -r <your-cool.server.com>:21117
and replace <your-cool.server.com> with the actual domain / sub-domain you'll be using.
NOTE: you need to own the domain you use. You can use a dynamic domain such as one from DuckDNS, or you can use a domain you won, and add a subdomain to it. You'll want your domain to have an A-record, or CName record that points to your server's pulbic IP address.
If you haven't already setup your domain / sub-domain to point to your public IP address, you'll want to do that. For a VPS, you should just get a public IPv4 address you can use.
If you're doing this from your home, you can use a site like http://ipchicken.com to view your public IP address. If your public IP changes regularly, I highly recommend using a service like DuckDNS to get a dynamic address that you can use. Here's a video on using DuckDNS with Docker as well.
Once you've setup your sub-domain /domain in the yaml file, save the file with CTRL + O, then press Enter to confrim, and exit the nano editor with CTRL + X.
Assuming you've setup your yaml file, and you have a domain or sub-domain name pointing to your public IP, we'll take a home-server setup inerlude. This will be the only difference for a Home Server vs a VPS setup.
Port Forwarding for Home Servers
If you are running a Home Server you need to forward a few ports through your firewall / router to the private IP address of the host machine you are running docker on.
You need to forward ports 21115 - 21119 (TCP) from your outside (internet / WAN) connection through to your host machine's private IP address.
You also need to forward port 21116 (UDP) through in the same way.
I can't explain how to do the port forwarding, as each router make and model can differ greatly. The best option is to specifically search "port forwarding on <your router make / model>" in Google, Whoogle, DuckDuckGo, etc.
Starting the Server
Presuming that you've done all of the necessary setup steps above, you can now run the server with the command:
docker-compose up -d
NOTE: you have to be in the rustdesk folder / directory when you run the above command.
Once you get a "done" message in the terminal, you can check the run logs with
docker-compose logs -f
Make sure you don't see any errors. Exit the logs with CTRL + C.
Now you'll need to get the RustDesk client downloaded and installed on your desire client machines.
Go to RustDesk.com and click the Download button. If you're running the client on a Linux machine, you can also try their new AppImage file to see if it will work. You can get it from the Release page on their GitHub site. Make sure you get the latest release, and look for the .appimage file.
Once downloaded, if you need to run the installer, run it per your Distros requirements. Windows is a zipped file, with an executable inside, so extract the file, then run the .exe to install.
Once you run the client it will connect to the RustDesk default servers. You'll see an ID number and passcode (hidden by default). Next to the ID you'll see a 3-dot icon. Click it, and select "ID/Relay Server".

In the pop-up window, will in the domain / sub-domain of your server, with the port in the first blank marked ID Server:

If you simply leave the other fields blank, RustDesk client will automatically put the right info in for you, even if it doesn't show.
If you opt for a more complex install, you can run the relay and rendezvous servers as two separate physical machines with different IPs, and you would want to then fill each blank here, but since we are using the amazing Docker, we don't need to.
Finally, when you click 'Ok', you should see the message at the bottom of the main RustDesk client window go to "Ready" as shown below.
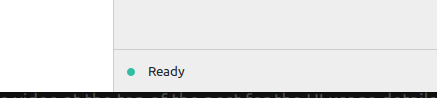
If you don't see Ready, you may need to check your sub-domain set in your docker-compose.yml file, your setup screen on the client, and finally ensure you have properly forwarded port 21117 as TCP through your router to the proper host machine.
If you see Ready, congratulations! You are now ready to setup a 2nd machine with the client software in the same way as above, and start making connections.
Check out the video at the top of the post for the UI usage details!
A Word on Security
In the RustDesk documentation, they discuss some important security items. Running RustDesk in the way discussed thus far, you'll be running unencrypted. This is likely perfectly fine for ap rivate network (local only network), however if you intend to use RustDesk across the internet, you sould go through the extra steps in their documentation to ensure you are getting an encrypted connection.
First, on your server, via the CLI, go to the folder inside the rustdesk folder called "hbbs"
cd ~/docker/rustdesk/hbbs
Next, look at the contents of the file called "id_ed25519.pub" with
nano id_ed25519.pub
Copy the key that is inside this file to a secure syncing storage like BitWarden, and then make sure to enter this key in the 'Key' field on all of your RustDesk clients. Now, when you connect two clients together that both have the same server URL, and the same key value, they will communicate via an encrypted connection.
How do I keep others from using my RustDesk server?
Again, we'll need that key value we got above. Go into your docker-compose file with the command:
nano docker-compose.yml
from the ~/docker/rustdesk folder. You can't get into this file from the hbbs folder, so drop down one level with
cd ..
then use the nano docker-compose.yml command.
Once back inside your docker-compose file, you'll want to use that key to modify 2 lines.
In the hbbr section, you'll change the command that reads:
command: hbbr
to read:
command: hbbr -k <your public key value here>
You'll also change the command line in the hbbs section from:
command: hbbs -r rustdesk.routemehome.org:21117
to read:
command: hbbs -r rustdesk.routemehome.org:21117 -k <your public key value here>
Now save with CTRL + O, and then press Enter to confirm, and exit the nano editor with CTRL + X.
Restart your docker containers with your new changes by simply running:
docker-compose up -d
again, and then test your system. If you try to connect to your server from a client without the key setup on the client as well, it should no longer connect.
This does two things.
- It makes certain that your clients are connecting using the key and encryption.
- No one without your key can connect through your server.
Support My Content
Support my Channel and ongoing efforts through Patreon:
https://www.patreon.com/bePatron?u=234177
No comments to display
No comments to display