Install Incus and Setup LXConsole
In this episode, we are covering the combination of two amazing open source projects. Incus (a fork of the LXD container system) is an incredibly powerful containerization that makes small virtual machines which share the resources of the host OS without specifically setting those resources aside as is generally done with full Virtual Machines (VMs).
LXConsole is a powerful web user interface controller that uses the Incus APIs to give you a spectacular controller for your Incus Installs. It can deal with multiple servers running Incus and is a great way to quickly get an overview of how your various servers and Incus containers are running.
What Do I Need
- A machine (preferably running Linux) to act as a "server". This doesn't have to be a full server, but any machine running Linux should work.
- Familiarity with the Linux command line (cli) is a plus, but not required, I'll walk you through what you need to know.
- A couple of hours of time over the whole span of the tutorial.
Installing Incus
I'll be providing instructions for Ubuntu / Debian based Linux Distros, but there are instructions for other distros on the Incus Documentation pages.
Ubuntu 24.04 and newer
If you are running Ubuntu 24.04 or later, you can simply run the following command:
sudo apt update && sudo apt install wget curl git openssh-server openvswitch-switch -y
This is a set of two command concatenated by the '&&' symbols. The first command tells your OS to update it's packages with the latest available versions (just grab a list of what's available, don't install anything yet). The second command then tells your OS to install the most up to date versions of any of the software that's missing, update any that needs to be updated, and leave the rest alone if it's already present and up to date.
sudo apt install incus -y
The above command installs the latest version of Incus available. After this, when you run the update and upgrade commands (or the graphical software updater on your system), Incus will be updated as needed.
Ubuntu 23.10 and older
If you are running Ubuntu versions older than 24.04, we need to do a little more work to get Incus installed.
curl -fsSL https://pkgs.zabbly.com/key.asc | gpg --show-keys --fingerprint
The command above will pull down the keys needed for Incus.
mkdir -p /etc/apt/keyrings/ <-- You may need to add sudo to the front of this, as it needs sudo privileges to run.
This command creates a new directory for your keys if it doesn't already exist.
sudo su -
Here we tell the system to switch us inot super user mode so we don't have to type 'sudo' before every command we are about to run.
curl -fsSL https://pkgs.zabbly.com/key.asc -o /etc/apt/keyrings/zabbly.asc
This command gets the Incus key and stores it in our keyring.
sh -c 'cat <<EOF > /etc/apt/sources.list.d/zabbly-incus-stable.sources
Enabled: yes
Types: deb
URIs: https://pkgs.zabbly.com/incus/stable
Suites: $(. /etc/os-release && echo ${VERSION_CODENAME})
Components: main
Architectures: $(dpkg --print-architecture)
Signed-By: /etc/apt/keyrings/zabbly.asc

EOF'
Run the above set of commands as a single block (copy the whole block, and paste it into your terminal and run it all together). This set of commands adds the zabbly repository to your repositories, then sets the stable incus channel as the one to pull from, an d prepares the OS for installation.
exit
Exit from super user mode. Now we update and install Incus with:
sudo apt update && sudo apt install incus -y
We Need a Static IP for our Servers
We installed an application earlier called openvswitch. This allows us to create a bridge network connection and set that bridge with a static IP address.
A bridge is just a "virtual" network connection which can connect two or more network devices together. In this case we will bridge one of our physical ports to the bridge, and then use it bridge any Incus container network devices (also virtual) to the main network for LAN and internet access.
In Ubuntu, there is a configuration file under the netplan folder in /etc. We'll be editing that file. First, you need to see what that file is named. I recommend geting back into super user mode for this part.
sudo su -
Now move to /etc/netplan with
cd /etc/netplan
and list out the files in this location with
ls
On my system, the file is called "50-cloud-init.yml". Yours may be named differently, but that's ok. First, we'll make a backup of this file before we modify it. This allows us to revert any changes if needed.
cp 50-cloud-init.yml 50-cloud-init.yml.bak
Now if you do
ls
You should see two files. One of them should end with '.bak'. Let's see what our network interfaces are called, and make not if it
ip -br -c a
lo               UNKNOWN        127.0.0.1/8 ::1/128
enp88s0          UP             192.168.10.39/24
enp89s0          DOWN
My interfaces are called 'enp88s0' and 'enp89s0'. We can see that my network cable is connected to enp88s0 as it's listed as "UP". We can also see the IP address that was dynamically assigned to the interface by my router. I'll make note of both the interface name, and IP. If you want to change the IP to something else, that's fine, just make sure the IP you are changing to isn't already in use on your network by another device.
nano 50-cloud-init.yml
In this file, we want to essentially remove all of the lines below the top commented section. Comments start with a pound sign (hashtag) '#', and are ignored by the system, so those can stay. You can used CTRL + k in the nano editor to delete the entire line where the cursor is sitting. I moved my cursor to the first uncommented line, then used CTRL + k repeatedly to remove all of the lines below the comments.
After removing all the lines, we'll paste in the following block, and then make some minor changes for your system and needs.
network:
    ethernets:
        enp88s0:  # <-- must match the name below
            dhcp4: false
            dhcp6: false
    version: 2

    bridges:
      bridge0:
        interfaces: [enp88s0]    # <-- must match the name above
        addresses: [192.168.10.39/24] #  <-- set this to the IP you want for this machine
        routes:
          - to: default
            via: 192.168.10.1  # <-- this is your router gateway address
        nameservers:
          addresses:
            - 192.168.10.1  # <-- this is your router gateway, remove if you prefer to use external DNS only
            - 1.1.1.1
            - 1.0.0.1
        parameters:
          stp: true
          forward-delay: 4
        dhcp4: no
In the above block, you need to change the interface name to match the name you saw previously when running the ip command.
You need to change it in two (2) places in the block. Make sure it matches in each location.
After that, adjust the IP address to be the address you want for your server.
Finally, adjust the line next to the via, to be the gateway address of your router.
Once you've made these changes, double check the spacing. Yaml is space dependent, so make sure your indentation matches mine above.
Save with CTRL + O, then press Enter to confirm, and use CTRL + X to exit the nano editor.
Now we'll test our netplan to make sure it's valid with
netplan try
You should get back some text like:
bridge0: reverting custom parameters for bridges and bonds is not supported

Please carefully review the configuration and use 'netplan apply' directly.
If so, you can now apply your netplan changes. If you got an error, go back in and try to find the error and fix it. Make sure it matches what I have above.
NOTE: If you changed the IP from what your dhcp server assigned, and you are SSH'd into your server, when you apply, you'll be locked out of the server, and will need to quit your terminal, and re-ssh into the new IP address.
netplan apply
This may take a minute or so, so be patient while the bridge is created.
Become part of the Incus Admin group
We want to be in the Incus Admin group, so let's add our user to that group.
sudo usermod -aG incus-admin brian <-- change 'brian' to your username.
Now we'll use two commands to get the change to take effect:
newgrp
newgrp incus-admin
Alternatively, you can just log out (exit) then log back in / ssh back in.
Install ZFS-Utilities and BTRFS Programs for our Storage Pools
We will ikely want to use some RAID technologies to store our data and all with Incus, though it's not required. I highly recommend installing at least the zfs-utlilities.
sudo apt install zfsutils-linux btrfs-progs -y
Initialize our Incus Installation
We need to initialize Incus on our server. This is a step you'll take anytime you install incus on a new server. The initilization process walks you through a few setup steps. In general, if you ware planning to use zfs, just take the defaults. The two items you want to be ready for are how large to make your default storage pool in GiB (essentially gigabytes). Secondly, if you want your containers to be available over your LAN (local area network) you'll want to type in 'yes' for that question. If you don't, you will only be able to access your containers on the host machine.
Enter the command:
incus admin init
You'll see multiple questions presented for the initialization. In most cases. you'll just take the default. In my example below, I was setting up a BTRFS default pool, but it's the same for ZFS as well.
Would you like to use clustering? (yes/no) [default=no]:
Do you want to configure a new storage pool? (yes/no) [default=yes]:
Name of the new storage pool [default=default]:
Name of the storage backend to use (zfs, btrfs, dir, lvm, lvmcluster) [default=zfs]: btrfs
Create a new BTRFS pool? (yes/no) [default=yes]:
Would you like to use an existing empty block device (e.g. a disk or partition)? (yes/no) [default=no]:
Size in GiB of the new loop device (1GiB minimum) [default=30GiB]: 200GiB
Would you like to create a new local network bridge? (yes/no) [default=yes]:
What should the new bridge be called? [default=incusbr0]:
What IPv4 address should be used? (CIDR subnet notation, “auto” or “none”) [default=auto]:
What IPv6 address should be used? (CIDR subnet notation, “auto” or “none”) [default=auto]:
Would you like the server to be available over the network? (yes/no) [default=no]: yes
Address to bind to (not including port) [default=all]:
Port to bind to [default=8443]:
Would you like stale cached images to be updated automatically? (yes/no) [default=yes]:
Would you like a YAML "init" preseed to be printed? (yes/no) [default=no]:
Listing, Pulling, and Creating Incus Images and Containers
After the initialization, you can list out any Incus containers from the command line with the command:
incus list
I highly recommend getting familiar with the Incus command line. It has a ton of capability and power. If you aren't sure what a command can do, you can follow it with --help to see more about the options you have with it.
When you do incus list the first time, you'll just get back headers with no data because you haven't yet created any Incus containers. To create a container, you need a starting base image. You can see a list of available images from the internet with the command:
incus image list images:
With the command above, note the colon ':'. It's important to the command. You'll see an incredibly long list of available images. I'll leave it to you to explore this list in more detail. For now, let's get a couple of things ready. We need a bridge network to allow our containers to get a LAN IP address. This bridge works in tandem with the bridge we made for our physical network earlier. We'll build this container bridge using Incus profiles. You can use Profiles to define all kinds of configurations, including networking and storage options for your containers. Then just apply the appropriate profile to any container you need it on.
To create a bridge profile, we'll use the following command:
incus profile create bridgeprofile
Next, we'll add devices and connection details to the profile, which will be used by any containers we apply it to down the road.
incus profile device add bridgeprofile eth0 nic nictype=bridged parent=bridge0
The command above says, to add a device to the profile 'bridgeprofile', and call that device 'eht0'. The device is a 'nic', and the 'nictype' is a bridge, and it's parent device is 'bridge0' that we created back when we were setting up our host server in netplan.
Now when we apply this profile to a container, it will create a network interface called 'eth0', and it will attempt to get an IP address from our DHCP server so we can reach it from our LAN directly.
Let's create a container from one of the images we got in our image list earlier, and apply the bridgeprofile to the container.
incus launch images:ubuntu/24.04 my-first-container --profile default --profile bridgeprofile
The command above tells incus to create and launch (start) a new container based on the ubuntu/24.04 image called 'my-first-container'. It also tells incus to use the 'default' storage profile for the containers primary storage, and to use the 'bridgeprofile' network we just created.
Give the image time to pull down, and start, then do
incus list
You should see something like this in your output, but possibly with different image base, and naming, etc.
Launching my-first-conatiner
$> incus list
+--------------------+---------+-----------------------+-------------------------------------------+-----------+-----------+
|        NAME        |  STATE  |             IPV4      |                     IPV6                  |   TYPE    | SNAPSHOTS |
+--------------------+---------+-----------------------+-------------------------------------------+-----------+-----------+
| my-first-conatiner | RUNNING | 192.168.10.165 (eth0) | fd4c:7db4:57e7::2e7 (eth0)                | CONTAINER | 0         |
|                    |         |                       | fd22:c422:2211:0:216:3eff:feda:6ae1 (eth0)|           |           |
|                    |         |                       | 2603:8080:7800:29::2e7 (eth0)             |           |           |
+--------------------+---------+-----------------------+-------------------------------------------+-----------+-----------+
LXConsole (Web UI for Incus)
While Incus has an incredibly powerful command line functionality, there is a really nice graphical user interface that allows you to control multiple servers from a single user interface. This wonderful bit of software is called LXConsole.
We can setup a container on our new server, install docker on it, and then run LXConsole in a container on the host that we want to control with LXConsole. If that makes you dizzy just thinking about the weird circular level of control, it's ok.
First, let's create a new container for our LXConsole application.
incus launch images:ubuntu/24.04 lxconsole --profile=default --profile=bridgeprofile -c security.nesting=true -c boot.autostart=true
The command above tells incus to create and launch a new container called 'lxconsole' based on the ubuntu 24.04 base image, and to use the default storage profile, as well as the bridgeprofile profile for networking. It also tells it to allow 'nesting' which will allow docker containers to run inside an incus container. Finally it sets the container to autostart if the server is rebooted for any reason.
Once this is started up, we'll want to jump into the container, and get it ready for LXConsole.
Use the 'incus shell' command to jump into it from the host terminal.
incus shell lxconsole
Now that we are in the shell, we are literally working inside the 'lxconsole' container. From here we want to do the following:
- Create a non-root, sudo privileged user.
- Install docker-ce and docker compose to our container.
- Add our non-root user to the docker group.
- Add folders for lxconsole and the certificates we need for it.
- Setup our compose.yaml file
- Start LXConsole server running.
- Add a server to be managed.
First, let's create our non-root user with sudo privileges.
adduser <username>
In this process, you'll be asked to provide a password for the user, and some other information. You need to enter the password and confirm it, but feel free to leave the other info blank.
Once done, we want to add our user to the 'sudo' group.
usermod -aG sudo <username>
Now, let's add a few applications to our container that will simply help us get things done more easily. Most Incus images are extremely minimal, on purpose, so it helps if we add a few applications initially.
apt update && apt install wget curl git nano openssh-server openvswitch-switch -y
This will give us the ability to SSH into our container, as well as to set it up with a static address, and to use nano as our text editor.
Next, let's exit from our container, and we'll ssh back in as our non-root user to finish up.
exit
You should be back at your host machine's terminal prompt. If not, just type exit again.
ssh <username>@<lan ip of container>
Enter your password, and you should be back at the container's prompt with your non-root user.
Next let's create 2 folders for our lxconsole install:
mkdir lxconsole
mkdir lxbackups
Now, let's install docker and docker compose.
curl -fsSL https://get.docker.com | sh
Once that completes. we'll add our user to the 'docker' group.
sudo usermod -aG docker <username>
Now, you can either exit the ssh session, and then re-ssh in, or do the following two commands:
newgrp
newgrp docker
Let's move into our 'lxconsole' folder, and create a new file called compose.yaml.
cd lxconsole
nano compose.yaml
Copy the code block below, and paste it into the compose.yaml file. Then save with CTRL + o, press Enter to confirm, and then use CTRL + x to exit the nano editor.
---
services:
  lxconsole:
    image: 'penninglabs/lxconsole:latest'
    restart: unless-stopped
    ports:
      - '80:5000'
    volumes:
      - /home/<username>/lxbackups:/opt/lxconsole/backups
      - ./certs:/opt/lxconsole/certs
      - ./server:/opt/lxconsole/instance
In this file, make sure to change <username> to the actual username of your user.
We are mapping the lxbackups folder we created to the backup location lxconsole will use when create a backup of your containers.
Once saved, and exited from the nano editor, let's pull the lxconsole image with
docker compose pull
Then we can start the lxconsole container with
docker compose up -d
Once it comes up, you can navigate in your browser to the IP address of your container. We mapped port 80 on the host, so this will allow you to simply go to the IP address of the lxconsole container, and you should be presented with the initial user registration form.
Create a new user on the web ui, give it a strong password, and login for the first time.
Next, we need to add a server to lxconsole. LXConsole uses public/private keys to access the host servers you wantn to control. So before we add the IP of a server, let's get the files setup that we need.
You want to be ssh'd into your host server (not the lxconsole container), for this next portion.
On the host server create a new file called 'lxconsole.crt'.
nano lxconsole.crt
Now in the lxconsole web ui, click on the 'Add Server' button in the upper right of the window. You'll be prompted with a modal (pop-up) window. In that window above the fields, you'll see a bit of information. There is a link on that information you need to click.
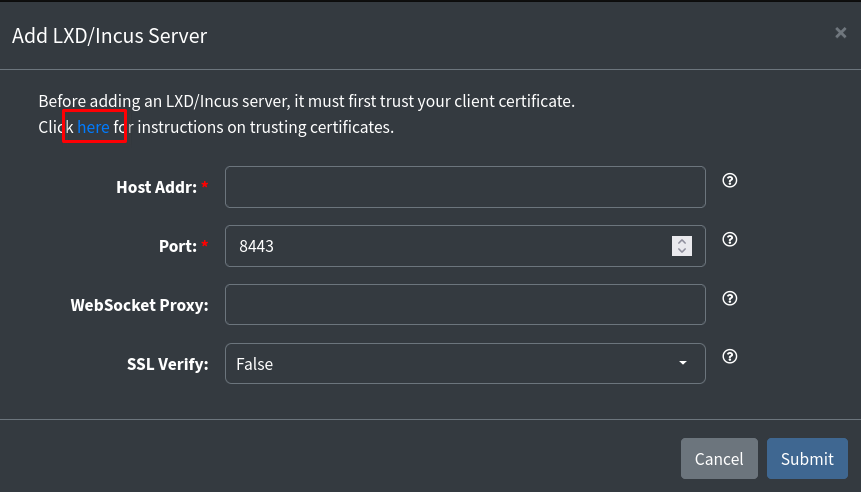
This will bring up a new modal with a large bit of text in it. You need to copy all of the text including the lines with 'BEGIN CERTIFICATE' all the way through and including the line with 'END CERTIFICATE'.
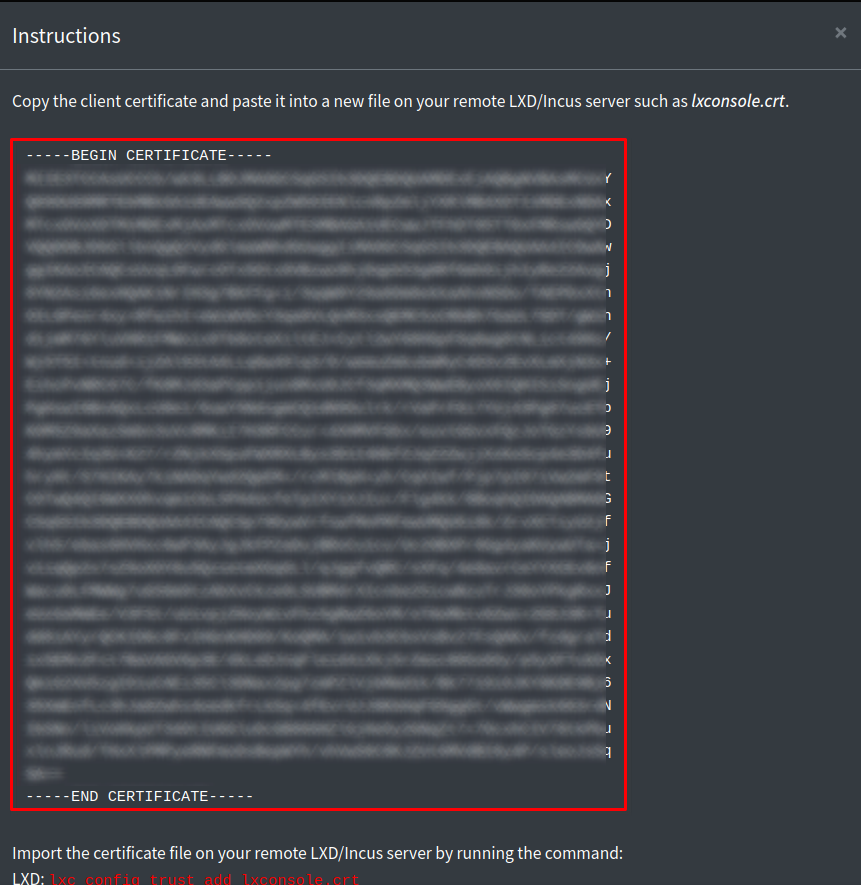
Paste that into the 'lxconsole.crt' file we just created on our host server, and save with CTRL + o, then press Enter to confirm, and exit with CTRL + x.
Next, in that same window where the Certificate text is on the Web UI, you'll find some commands below the text. We want to use the commands for 'Incus', and run those on our host server. Simply highlight each command one at a time, copy it, then paste it into the terminal and run it by pressing Enter.
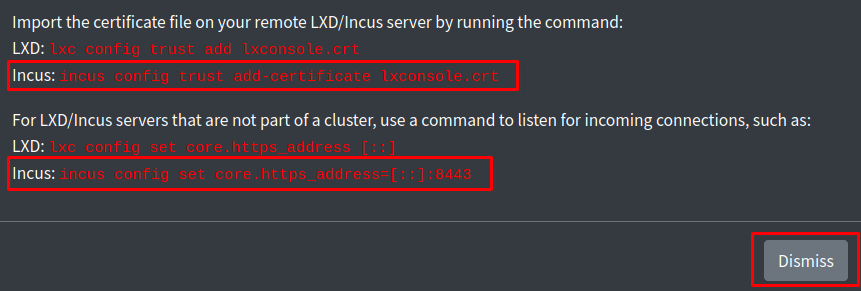
After running those two commands, click the 'Dismiss' button on the Web UI, and now you can enter the IP address of your host server where we installed Incus.
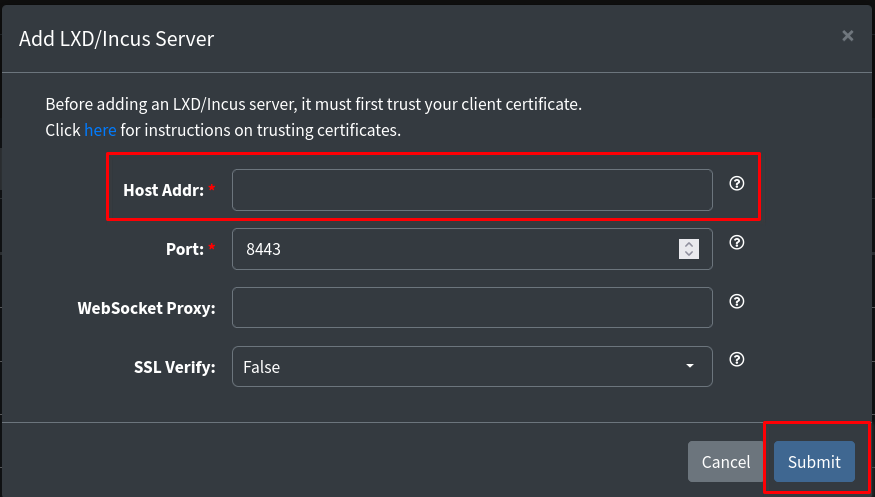
No need to fill anything else out, just enter the IP of your host machine, then click 'Submit'. This will add your server to the LXConsole Web UI.
I'll leave it to you to watch my video, as well as those of Scott over at Scottabyte. He has a bunch of great write ups and videos on Incus, LXConsole, and so much more that you should definitely check out.
Support My Channel and Content
Support my Channel and ongoing efforts through Patreon:
https://www.patreon.com/awesomeopensource
Buy me a Beer / Coffee:
https://paypal.me/BrianMcGonagill
No comments to display
No comments to display