Install, Run, and Federate Databag
I have covered multiple chat applications over the years, and as I was digging through my list of bookmarks I ran across this application that I had put aside unitl it had become a little more mature. It's still quite new, but also in a state where I believe it is ready for more adoption. The developer is responsive to his Github issues for now, and is actively seeking help with design and workflows.
What you'll need
- A server to run the application on.
- Docker and Docker-Compose (alternatively Portainer) Installed
- Git Installed
- A Reverse Proxy (I use NGinX Proxy Manager)
- A domain that you own, and can add A-Records (and optionally subdomains) for.
- About 10 minutes of your time.
If you don't want to setup Databag on your home server, or if your ISP blocks you from using ports 80 / 443, then you might want to take a look at Digital Ocean. They have really inexpensive VPS (Virtual Private Servers) that make it easy to spin up a project just like this one. If you use my affiliate link, you'll get 50 days with $50 - $100 credit to try out Digital Ocean. I only get a credit, and only if you like their service and become a paying user after the credit is done. The server you'd need for Databag is their least expensive (from $4 to $6 a month US).
Install Docker, Docker-Compose, and NGinX Proxy Manager
Installation via a Simple Script
You can easily install Docker-CE, Docker-Compose, Portainer-CE, and NGinX Proxy manager by using this quick install script I created and maintain on Github. Just use the command:
wget https://gitlab.com/bmcgonag/docker_installs/-/raw/main/install_docker_nproxyman.sh
To download the script to your desired host.
Change the permissions to make the script executable:
chmod +x ./install_docker_nproxyman.sh
and then run the script with the command:
./install_docker_nproxyman.sh
When run, the script will prompt you to select your host operating system, then will ask you which bits of software you want to install.
Simply enter 'y' for each thing you want to install.
At some point, you may be asked for your super user (sudo) password as well.
Allow the script to complete installation.
At this point, you might want to log out and back in, as this will allow you to use the docker and docker-compose commands without the need of sudo in front of them.
Installing Databag
I like to put my docker applications inside of a single docker folder. First do an ls command and make sure you don't already have a folder called "docker".
If you do, then change into that folder:
cd docker
If not, then we can create the folder first, and then move into it.
mkdir docker
cd docker
Now we need to clone the Github repository for Databag. This will create a folder in our current directory called "databag", once it's done we'll move into it and complete our setup for installation. Enter the following command to clone the repository:
git clone https://github.com/balzack/databag.git
When it's done cloning the repository, move into the databag/net/container directory with:
cd databag/net/container
Again, list the files from this directory with:
ls
You'll notice a file called "compose.yaml" in this directory. We want to keep this file, so we'll make a copy of it, then rename this file to keep it as a backup of the original (a good practice anytime you'll be making modifications to a file in any filesystem).
cp compose.yaml docker-compose.yml
The command above says copy (cp) the file called "compose.yaml" into a new file called "docker-compose.yml".
mv compose.yaml compose.yaml.bak
The command above says rename (move mv) the file called "compose.yaml" to a new file called "compose.yaml.bak".
Next, we need to edit the docker-compose.yml file. We need to add an environment variable to it so that we can get Admin access to the applications, and create invite links. The invite links allow us to create a user for logging in. We'll use the nano text editor in the command line, but feel free to use any text editor you like. Just make sure it only saves the text you enter, an not extra characters.
The original file will likely look like:
version: "3.9"
services:
 databag:
   container_name: databag
   image: balzack/databag:latest
   ports:
     - "7000:7000"
   volumes:
     - ./databag-data:/var/lib/databag
We need to fix the spacing, keep in mind yaml is space dependent. You must not use tabs. Only spaces. We want to make sure that all indentations are two spaces more than the previous indentation level. Once adjusted the file should look like:
version: "3.9"
services:
  databag:
    container_name: databag
    image: balzack/databag:latest
    ports:
      - "7000:7000"
    volumes:
      - ./databag-data:/var/lib/databag
Next, we need to add a new item at the end of the file on line 10. We'll add two lines, again make sure to use spaces to indent these new lines properly. When you've added them, the file should look like this:
version: "3.9"
services:
  databag:
    container_name: databag
    image: balzack/databag:latest
    ports:
      - "7000:7000"
    volumes:
      - ./databag-data:/var/lib/databag
    environment:
      - ADMIN=<aSuperSecureLongStrongSecretPasswordNoOneCanEverGuessInAMillionYears>
Replace my password placeholder between the less than and greater than "<" and ">" (removing those symbols) with a password that is long, strong, random, and has numbers letters (upper and lower case), and symbols.
One other adjustment you may, or may not, need to make - is to the port mapping. The part where it says "7000:7000". If your host machine, the machine where you installed docker is already using port 7000 for another service, then you'll want to change the left side of that mapping to some other port number that isn't in use. Just keep in mind what you change it to. You can pick any number up to 65000. So let's say you want that port to be 10203, your mapping would look like
"10203:7000"
Finally, now save the file with CTRL + O, then press Enter to confirm, and exit the nano editor with CTRL + X.
Download the Docker Images and Start the Server
Let's use two commands concatenated (stuck together) with two ampersands (&&) to bring up our server, and make sure we don't see any errors:
docker-compose up -d && docker-compose logs -f
The first command tells docker to pull down the necessary images, and start them up. The second part says when the first part is complete, show me the logs of what is happening on my server. We are just looking for anything that says ERROR or Error, and if we don't see that, but instead see a message that the server is started or listening, we should be good to go.
Setup our Reverse Proxy
A reverse proxy isn't necessary if you are running the application on a digital ocean droplet, though you should adjust your port mappings, and you need to know how to get LetsEncrypt certificates, or some other CA Certified certificate for the application to be accessible. So I still suggest using a reverse proxy to help you handle all of that. I use NGinX Proxy Manager (NPM for short). It's anice tool that provides a web GUI (graphical user interface) to keep it easy to setup reverse proxies for you applications. Feel free to use other proxies if you want.
Log into NGinX Proxy Manager, navigate to the Proxies page, and click the button at the top right to add a new proxy host.
In the first line, type the domain / subdomain url you want for your Databag site. I called mine "databag.routemehome.org". I own the domain "routemehome.org". An A-Record is setup on my registrar to point all requests for any subdomain with "routemehome.org" as the domain, to my IP address. Next, we'll enter the IP Address of our application host machine. If you are running NPM on the same docker host as your application, you can enter "localhost" here. Move to the "Port" field, and enter the port you set on the left side of the port mapping. If you left it as 7000, then enter 7000, but if you changed it to another port number, make sure to enter that port here. Tick the options for "Block Common Exploits" and "Websocket Suupport", then move to the "SSL" tab at the top of the pop-up (modal) window.
Now, select "Request a New Certificate" from the first drop-list, then tick the options for "Force SSL" and "HTTP/2 Support". Make sure your email is entered correctly, then tick the option to accept the terms of service. Click 'Save'. Be patient, as LetsEncrypt will be trying to challenge your domain, and make sure it can connect on port 80. It should be able to do this. If it can't you'll get an error, in which case you'll want to make sure your firewall is forwarding ports 80 and 443 to your NPM host IP address on your internal network. If everything is in order, the pop-up will close without any errors, and you'll see the new subdomain in your proxy list with LetsEncrypt in the row.
Click on the subdomain to open it in a new window and you should be directed to your Databag login screen.

The flow the request will follow is seen above. It's important for you to understand all of the parts at play. The request originates from somewhere on the internet, which is then translated to a public IP address, and then forwarded through a firewall to the proxy server, which then handles the request and sends it to the right application server for a response. If the proxy doesn't have a URL entry for the requested URL, it will simply show a default screen to let the user know there's nothing available at the URL provided.
Initial Setup as an Admin
Remember that long, strong password I had you make in the docker-compose.yml file? Well, this is when you need it. Click on the gear icon in the upper right of the Databag screen, and you'll be prompted to enter the Admin password. That's where you'll enter the password you created. Once entered, click 'Login', and you'll be taken to a screen with a few icons on it.
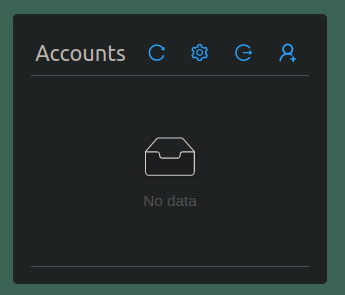
You can use the little person icon to create an invite link for a new user. The link, can then be sent via various methods available to you, and once clicked, the user will be prompted to create their username and password for the system. You can click the icon that looks like a gear, and you'll be prompted to enter your servers hostname (subdomain / domain name) for federating, as well as a few other options you can set server-wide.
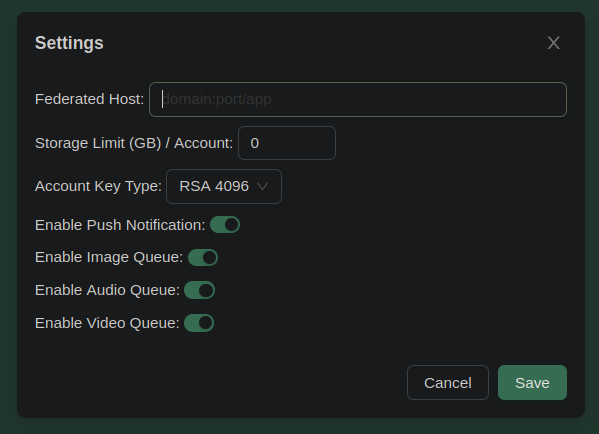
Once entered, and set, click the 'Save' button to have your server updated.
Now you can login, and / or continue creating invite links for other users.
To search for users on other servers, you'll need the server address, currently there's no central server registry, again the author is attempting to cut down on noise and spam... but maybe a registry will come along eventually.
In the video at the top of the post I show some of the ins and outs of the user interface, like setting up your user profile, searching for other users and adding them as contacts, using the mobile apps on your various devices, and much more. So watch it for all the details.
Support my Channel and Content
Support my Channel and ongoing efforts through Patreon:
https://www.patreon.com/awesomeopensource
No comments to display
No comments to display