Install Matrix using the Dendrite Server
What You'll Need
- A host server or machine (VM or LXC / LXD Container)
- Docker-CE and Docker Compose installed
- NGinX Proxy Manager, or a reverse proxy you prefer to use
- A domain name / sub-domain that you own and can create A-records for
- The Ability to port forward through your router / firewall from the internet o your LAN (Local Area Network)
- About 30 minutes of your time
Create an LXC VM for our Install
- Create an LXC container (I used Ubuntu 22.04, but any OS that you are familiar with should work).
- Update the LXC packages, and Upgrade it fully.
sudo apt update && sudo apt upgrade -y
3. Create a non-root user with sudo privileges.
adduser <your preferred username>
Enter a strong password when prompted, then confirm by entering it again. Fill in the brief form if you want, but it's okay to leave it blank. Finally, answer ‘Y’ to confirm your entries, and press Enter.
You now have a new user, but you need to make sure this user has "sudo" (super user) privileges when needed. For that we'll use the command
usermod -aG sudo <your preferred username from above>
The command above says modify the user (usermod) and give them all (-a) privileges in the group (G) sudo, and include the users listed ( your username).
Now, reboot, then ssh or log back in as your new user with super user privileges.
Install Dcoker-CE, Docker Compose, NGinX Proxy Manager
Copy this script to your local server with the command:
wget https://gitlab.com/bmcgonag/docker_installs/-/raw/main/install_docker_nproxyman.sh?ref_type=heads -O install-docker.sh
Change the script permissions to be executable
chmod +x install-docker.sh
Run the script (as a non-root user with sudo privileges)
./install-docker.sh
After the install completes, reboot so your user will be part of the docker group, and won't have to use sudo to do anything related to docker.
Once the system comes back up, let's make a space for our install with a folder structure that is easy to follow.
mkdir -p docker/matrix
This command will check to see if the “docker ” folder already exists, and if it does, will use that folder. If, however, it doesn't it will create that folder. Next, it will do the same for a folder inside the docker folder called “matrix”.
Now, we'll move into the “matrix” folder with
cd docker/matrix
Let's pull down the docker-compose file we'll need from the Dendrite project. Dendrite is the server that runs our Matrix chat system.
wget https://raw.githubusercontent.com/matrix-org/dendrite/main/build/docker/docker-compose.yml -O docker-compose.yml
Now we need to open this file up, and make a few edits. For this we'll use the nano text editor. Feel free to use any other text editor you prefer.
nano docker-compose.yml
version: "3.4"

services:
  postgres:
    hostname: postgres
    image: postgres:15-alpine
    restart: always
    volumes:
      # This will create a docker volume to persist the database files in.
      # If you prefer those files to be outside of docker, you'll need to change this.
      - ./dendrite_postgres_data:/var/lib/postgresql/data
    environment:
      POSTGRES_PASSWORD: a-very-long-strong-password-here
      POSTGRES_USER: dendrite
      POSTGRES_DATABASE: dendrite
    healthcheck:
      test: ["CMD-SHELL", "pg_isready -U dendrite"]
      interval: 5s
      timeout: 5s
      retries: 5
    networks:
      - internal
  monolith:
    hostname: monolith
    image: matrixdotorg/dendrite-monolith:latest
    ports:
      - 8008:8008
      - 8448:8448
    volumes:
      - ./config:/etc/dendrite
      # The following volumes use docker volumes, change this
      # if you prefer to have those files outside of docker.
      - ./dendrite_media:/var/dendrite/media
      - ./dendrite_jetstream:/var/dendrite/jetstream
      - ./dendrite_search_index:/var/dendrite/searchindex
      - ./:/mnt
    depends_on:
      postgres:
        condition: service_healthy
    networks:
      - internal
    restart: unless-stopped

networks:
  internal:
    attachable: true
volumes:
  dendrite_postgres_data:
  dendrite_media:
  dendrite_jetstream:
The way I've modified this file is minimal, however, it's worth noting, that I have intentionally changed it to keep all of the mapped volumes (a folder of files that will be persisted on your host system between docker updates to the server and services). I have set these volumes to be kept inside this parent “docker/matrix” directory structure.
Once up and running, you just need to zip up the parent level docker folder, and then copy it off on a regular schedule to another system as a backup. I highly recommend daily for an active chat server to reduce the risk of lost chat data.
Next, let's make our configuration directory (what the compose file is expecting).
mkdir config
Now we'll pull down the dendrite sample file from their github page, and use that as our starting point. I'll additionally paste in my file for context, but note this file can and will change over time, so it's better to start with the project's provided sample file when possible.
wget https://raw.githubusercontent.com/matrix-org/dendrite/main/dendrite-sample.yaml -O ./config/dendrite.yaml
We need to modify this file, so again we'll turn to the nano text editor.
nano config/dendrite.yaml
The following file is my file after modification. It has a lot of the comments removed. The example file provided by the project, however will have a lot more comment lines that are extremely helpful in understanding what each option is.
# This is the Dendrite configuration file.
#
# The configuration is split up into sections - each Dendrite component has a
# configuration section, in addition to the "global" section which applies to
# all components.

# The version of the configuration file.
version: 2

# Global Matrix configuration. This configuration applies to all components.
global:
  # The domain name of this homeserver.
  server_name: matrix.<your domain name>.org   # change this to your server name
  private_key: matrix_key.pem
  old_private_keys:
  key_validity_period: 168h0m0s
  database:
    connection_string: postgresql://dendrite:use-a-very-long-strong-password-here@matrix-postgres-1/dendrite?sslmode=disable  # change the password section to your strong password from the docker-compose file - they have to match!
    max_open_conns: 90
    max_idle_conns: 5
    conn_max_lifetime: -1

  cache:
    max_size_estimated: 1gb
    max_age: 1h

  # The server name to delegate server-server communications to, with optional port
  # e.g. localhost:443
  well_known_server_name: "matrix.<your domain name>.org:443"  # change domain to your domain name

  # The base URL to delegate client-server communications to e.g. https://localhost
  well_known_client_name: "https://matrix.<your domain name>.org"  # change domain to your domain name

  trusted_third_party_id_servers:
    - matrix.org
    - vector.im

  disable_federation: false

  presence:
    enable_inbound: false
    enable_outbound: false

  report_stats:
    enabled: false
    endpoint: https://panopticon.matrix.org/push

  server_notices:
    enabled: true
    local_part: "_server"
    display_name: "Server Alerts"
    avatar_url: ""
    room_name: "Server Alerts"

  jetstream:
    addresses:
    # - localhost:4222
    disable_tls_validation: false
    storage_path: ./
    topic_prefix: Dendrite

  metrics:
    enabled: false
    basic_auth:
      username: just-some-metrics
      password: my-metrics-in-metrics

  dns_cache:
    enabled: false
    cache_size: 256
    cache_lifetime: "5m" # 5 minutes; https://pkg.go.dev/time@master#ParseDuration

app_service_api:
  disable_tls_validation: false
  config_files:
  #  - /path/to/appservice_registration.yaml

client_api:
  registration_disabled: true  # If you want to allow registration, you really should setup verification
  guests_disabled: true  # if you want to allow guests to register, please setup verification
  registration_shared_secret: "make-this-a-long-strong-key-with-a-lot-of-characters"
  enable_registration_captcha: false

  # Settings for ReCAPTCHA.
  recaptcha_public_key: ""
  recaptcha_private_key: ""
  recaptcha_bypass_secret: ""

  # To use hcaptcha.com instead of ReCAPTCHA, set the following parameters, otherwise just keep them empty.
  # recaptcha_siteverify_api: "https://hcaptcha.com/siteverify"
  # recaptcha_api_js_url: "https://js.hcaptcha.com/1/api.js"
  # recaptcha_form_field: "h-captcha-response"
  # recaptcha_sitekey_class: "h-captcha"


  # TURN server information that this homeserver should send to clients.
  turn:
    turn_user_lifetime: "5m"
    turn_uris:
      - turn:turn.a-turn-server.com?transport=udp   # I'll have a video / tutroial later for setting up your own turn server
      - turn:turn.a-turn-server.com?transport=tcp
    turn_shared_secret: "yet-another-long-strong-password"
    # If your TURN server requires static credentials, then you will need to enter
    # them here instead of supplying a shared secret. Note that these credentials
    # will be visible to clients!
    #turn_username: "a-unique-username"
    #turn_password: "another-very-long-strong-password"

  rate_limiting:
    enabled: true
    threshold: 20
    cooloff_ms: 500
    exempt_user_ids:
    #  - "@user:domain.com"

# Configuration for the Federation API.
federation_api:
  send_max_retries: 16
  disable_tls_validation: false
  disable_http_keepalives: false
  key_perspectives:  # These keys have been modified from the original values...
    - server_name: matrix.org
      keys:
        - key_id: ed25519:auto
          public_key: Noi6WqpDj0QoPxCNQfgezwJlBKrfqehY1u2FyWP9uYw
        - key_id: ed95319:a_BX6a
          public_key: l8Hff5qXKn1vfHrg3p4_e8gELOVo8P13JkluMfmn2sQ
  prefer_direct_fetch: false

# Configuration for the Media API.
media_api:
  base_path: ./media_store
  max_file_size_bytes: 20971520 # 20 MB
  dynamic_thumbnails: false
  max_thumbnail_generators: 10
  thumbnail_sizes:
    - width: 32
      height: 32
      method: crop
    - width: 96
      height: 96
      method: crop
    - width: 640
      height: 480
      method: scale

# Configuration for enabling experimental MSCs on this homeserver.
mscs:
  mscs:
  #  - msc2836  # (Threading, see https://github.com/matrix-org/matrix-doc/pull/2836)

# Configuration for the Sync API.
sync_api:    # I'm using NGinX Proxy Manager, and I don't set this here...you may need to if you're using a different reverse proxy...
  # real_ip_header: X-Real-IP

  # Configuration for the full-text search engine.
  search:
    enabled: false
    index_path: "./searchindex"
    language: "en"

# Configuration for the User API.
user_api:
  bcrypt_cost: 10
  # openid_token_lifetime_ms: 3600000
  auto_join_rooms:
    - "#<your preferred room>:matrix.<your domain name>.org" # you would change this to your preferred room and your server

# Configuration for Opentracing.
tracing:
  enabled: false
  jaeger:
    serviceName: ""
    disabled: false
    rpc_metrics: false
    tags: []
    sampler: null
    reporter: null
    headers: null
    baggage_restrictions: null
    throttler: null

# Logging configuration.
logging:
  - type: std
    level: info
  - type: file
    level: info
    params:
      path: ./logs
Once you've set your yaml file up. you need to generate some keys for the dendrite server to use. These keys need to be put into a certain place inside the dendrite server container. For this, we'll use the following command:
docker run --rm --entrypoint="" -v $(pwd):/mnt matrixdotorg/dendrite-monolith:latest /usr/bin/generate-keys -private-key /mnt/matrix_key.pem -tls-cert /mnt/server.crt -tls-key /mnt/server.key
Once those are in place, we are ready to start our docker containers up and get to chatting.
Use the command:
docker compose up -d && docker compose logs -f
This is really a set of two commands concatenated with the "&&" sign. The first command says pull down the images and start the containers running. The second part says to show the logs of the servers as they start up. It's optional to run that part, but I like to try to watch for any errors as it starts.
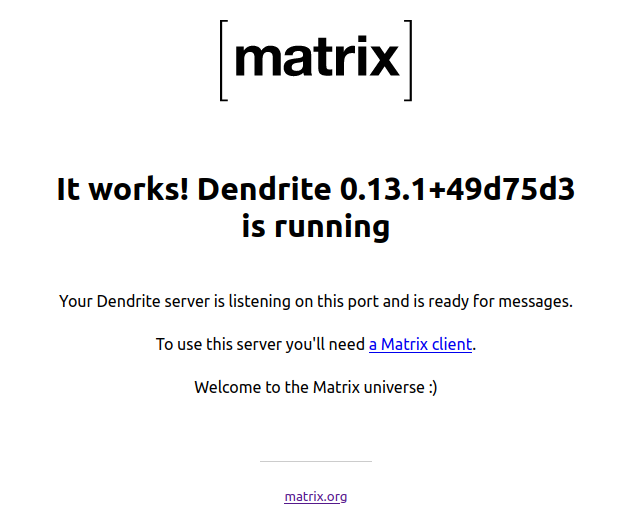
Once it settles, and is up and running, we want to see if our server is ready. We should be able to reach the server at it's IP and port 8008 initially. My server is on IP 192.168.10.110, so I opened my web browser and went to http://192.168.10.110:8008.
There I was greeted by the very basic matrix page, that simply confirms the server is up and running.
Next, we need to setup our reverse proxy so we can have our subdomain pointed to our matrix server.
Set Up a Reverse Proxy
A reverse proxy is a tool that allows you to run multiple applications or services behind a firewall at a single public IP address and route the requests for those services to the proper service. So when my firewall receives a request for a service or application on port 80 or 443 it knows to forward that traffic to my reverse proxy server inside my network. The reverse proxy then looks at the URL being requested, and compares it to the list of known URLs it serves. If it finds that URL in the list, it will send the request on to that server, container, or machine.
In this case we are going to setup the NginX Proxy Manager (NPM from this point on) reverse proxy to deal with requests for our matrix server on port 8008. In NPM go to the Proxy Hosts page, adn click the Add Proxy Host button. In the window that pops up we need to enter our desired site name. Let's call this "chat.routemehome.org". You will need to use a domain name that you own, and that you have an A-Record setup for so it points to your public IP addresss. You can alternatively have an A-record wildcard entry that allows you to specify subdomains on the fly. It would look something like this in your DNS setup on your domain registrar.
| Record Type | Sub Domain | IP Address |
|---|---|---|
| A | *.your-domain.com | 221.251.145.23 |
This type of A-record will then allow you to simply pick any subdomain name you want with the domain “your-domain.com”.
1. Once you've entered your desired sub-domain into NPM, make sure to press the Tab or Enter key to make ti turn into a chip, or it will be removed when you move to the next field.
2. Now, set the private IP address of your dendrite server. This could be one of the following:
| Type | Potential IP |
|---|---|
| Same Machine as NPM in the same docker network that isn't the default | The Name of the dendrite container (matrix-monolith-1 for example) |
| Same Machine as NPM not int he same docker network | localhost, or the internal docker IP / Gateway address for this container |
| Different machine | Private IP on Network. |
For my setup I'll be using the private IP address of my machine. So I set 192.168.10.110.
3. Next, enter the port 8008 into the port field.
4. Toggle on the option for Block Common Exploits, and Websocket Support, then click Save.
5. Now, in NPM, click the entry for "chat.your-domain.com". YOu should again see the simple Matrix acknowledgement web page.
If you don't get directed to your Matrix generic page, re-check that everything is setup properly.
- An A record that points to your Public IP (note: some ISPs block prots 80 and 443).
- Port 80 and 443 forwarded through your firewall to the host machine running NGinX Proxy Manager
- An entry in NPM for “chat.your-domain.com” (of course using your actual domain).
6. Assuming everything is working as planned, click on the 3-dot icon at the right end of this entry in NPM.
7. Go to the SSL tab, and click the drop-down marked ‘None'. Choose ‘Request a New Certificate’.
8. Then toggle on ‘Force SSL’ and ‘HTTP/2 Support’.
9. Toggle on 'Agree to LetsEncrypt' Terms of Service', and make sure your email is filled in.
10. Click ‘Save’.
It should spin for 20 or 30 seconds, maybe less, then the pop-up window should close with no errors. If you click on the chip for “chat.your-domain.com” now, you should go to the same Matrix page, but it should now have the lock icon with no warnings before you get there.
Setup Federation (Optional)
Federation means that you server can connect to other servers, rooms, and people in the Matrix universe of servers, and that those servers can also connect to your server, rooms (that you've allowed through the configuration), and users.
If you are trying to create a non-federated (private) server that only allows users to talk to other users on this same server, then you do not want to federate. You can jump down to "Creating Users".
In order for Matrix to federate properly, I had to forward one port through my firewall directly to the host where I'm running my Dendrite server. The port is 8448. I forward both TCP and UDP traffic through my firewall to my host machine running Matrix. If, however, you changed the port mapping (left side) in the docker-compose for port 8448 to a different port, you'll want to map port 8448 from the WAN (web / internet) side of your firewall, to the port you set in the docker-compose mapping on the LAN (private network) side of your firewall.
After you've done that, you can test federation by using the Federation tester provided by the matrix team.
Go to https://federationtester.matrix.org/ , enter your matrix URL in the field, and click ‘Go’. YOu should get back something like this:
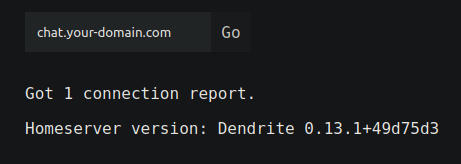
There is more on the page with your URL, Public IP, etc. But if you see this, then federation is functioning. Now it's time to create some users.
Creating Users
Creating Users, when you have registration disabled, is done through the CLI (terminal). For a family, or even a small organization this isn't too bad, but if you have more than 15 or so users, it might get a bit tedious. YOu might consider investigating enabling registration, and learning how to enable the protections that Matrix offers for that to avoid spammer sign-ups, etc. Matrix also supports some forms of SSO.
In our case we'll use the manual method for creating an admin user, then we'll go through creating a normal user. For this, I highly recommend the following:
A password manager ( I prefer, and use, Bitwarden, but any encrypted password manager is better than none at all).
A pre-defined list of the users you want, and a username for each.
A method to securely give each user their username, your server URL, and their initial password you create and a token that will be generated for them on creation.
Admin User Creation
To create your first / admin user we need to jump into the dendrite monolith container shell. To do this we'll use the following command:
docker exec -it matrix-monolith-1 /bin/sh
This will put you into the shell in the running container.
Next, we'll use the command:
/usr/bin/create-account -config /etc/dendrite/dendrite.yaml -username <your preferred usrnamge>_admin -admin
I highly recommend creating two accounts for yourself, and any other user who may be an admin. One admin account, and one normal usage account for daily chat and messaging activity. The admin account should not be the one you use daily for normal messaging. It should be reserved for admin activity only.
When you press enter, you'll be prompted to enter a long, strong passsword, then to confirm that password.
After that, a token will be generated and displayed in the terminal shell. I recommend you copy this and also save it in your password maanager somewhere for this user. Each user will get their own toekn as they are created.
Normal User Creation
Next, we'll create a normal user. This will be the method / command you'll use for each non-admin account.
/usr/bin/create-account -config /etc/dendrite/dendrite.yaml -username <your preferred username>
Again, you'll be prompted to enter a long, strong password, and then confirm it. You'll then be given a special token for this user that you should store in a secure password manager along with the username and password.
Matrix Clients
You can test out your login by going to the Element web client at https://app.element.io. You'll wantn to edit the server to change it from “matrix.org” to your server URL. Once changed it should give no errors in communicating with your server, and you should be able to use your username and password to login.
There are a lot of clients for all of the various operating systems out there, so it's going to be a definite personal choice as to which client you will like, and want to use, but I'm sure there is one you'll love.
Open Source seems to be the vast majority of the clients, so that, for me, is a huge plus.
A couple I like on Linux.
The official Element app is pretty good. Looks just like the web site app, so most likely an electron app. The other one I really like is called Moment. It's PyQt (python), fast and sleek looking, but it has an issue with the Dendrite server vs. the Synapse server and throws constant sync errors, then doesn't function after that. I'm hoping they'll fix it at some point, but we shall see.
Support My Channel and Content
Support my Channel and ongoing efforts through Patreon:
https://www.patreon.com/awesomeopensource
No comments to display
No comments to display