VLANs in pfSense with Virtual APs and Wireless SSIDs in DD-WRT
The Setup
The WAN (internet) will feed into the pfSense firewall, and we will use 4 VLANs on a single interface going out to our router. We will then set each VLAN up on it's own wireless SSID.
The Benefit:
- We control the DHCP Ranges and addressing for each VLAN from pfSense (1 place).
- We control the Rules for each VLAN to cross-communicate with each other or not from pfSense (1 place)
- We can setup our business or home to segregate concerns and free up network traffic between VLANs.
- Employee VLAN is just for Employees
- Cams VLAN is just for Security Camera Traffic
- Guest VLAN is for clients / customers
- IoT VLAN is just for the IoT devices in our office / home.
- Instead of having 120 devices on 1 wifi network, we reduce it to 10 to 40 devices on a wifi network.
Related Details (Dependencies)
I've shown previously how to setup the VLANs on pfSense / OpnSense, so definitely go check out that video if you haven't gone through that yet. I had to use it to refresh myself on the process (I kept forgetting to enable the DHCP server after setting it up).
Basic steps to setup the VLANs in pfSense:
- Make sure you define the port(s) you want to use for each VLAN
- Rename the generic Interface name, enable the VLAN interface, and give it an IP Address and range (e.g. 10.100.120.1/24)
- Setup the DHCP server for each VLAN, enable it, and provide a range of addresses to be given out to devices connecting to that VLAN.
- Setup Firewall rules to allow the VLANs to communicate to wherever you want them to.
Next, we need to get in our DD-WRT interface. Again, I have a video on turning a DD-WRT device into a “dumb” Access Point (AP). This means it doesn't act as a DHCP server, but instead is just an endpoint for a device to connect to via physical port, or Wifi connection. Make sure to go watch that video and get your device(s) setup before continuing as well.
A Caution Before Proceeding
VLAN functionality is very much hardware dependent. You really need to understand that tup may have to differ slightly from mine depending on the hardware you are using.
I'm going to be using an ASUS AC-RT56U router. This is a router with 2.4 GHz and 5 GHz bands, and wireless AC capability. This particular model router has a Broadcom chipset. The issue with this is that Broadcom is not “well behaved” with DD-WRT when it comes to bridged VAPs (Virtualized Access Points). So I have to set a startup script in order to get it to work properly. You may or may not have to do the same, so just understand you can try it first.
Initial Housekeeping
Before you begin making any VLAN modifications you should absolutely make a backup of your current DD-WRT install.
Create a backup of your DD-WRT setup by logging into your DD-WRT router, then go to Administration, select the Backup tab, and click the Backup button at the bottom. This should generate a .bin file, and download it to your computer. Rename it if you prefer. I rename them so I know what state it was in, and when.
The backup is useful, so if you mess up, it's easy to reset the router to stock DD-WRT, and then restore from the Backup to get back to where it was without going back through all the steps again.
I use this method as I try anything new, and as I successfully get through various steps I make a new backup, so again, I don't have to go back through all the steps again if something goes wrong at any point.
Let's Get Started
My router has 4 ports, plus a WAN port. I chose to make the WAN port act like just another LAN port. Your router may only have 2 ports, in which case, you need to set both as LAN ports if poosible. You'll need to have one you can use for making the changes, and one you can use for setting the VLANs. A good backup is to setup an initial Wireless SSID and password…this will allow you to connect wirelessly and make changes, or revert changes should you accidentally block your ports with any change.
I'm going to use Port 3 for my VLAN setup. There is no rhyme or reason to my selection, it is random, and up to you to choose which port you want to use.
Connect your computer to the router with an Ethernet cable. I'll connect to port 4. (if your computer / tablet only has wifi, then connect via WIfi).
Connect your router to your pfSense firewall using any other port on the router that is defined as a switch (LAN) port. I connected initially to my LAN port 2.
Switch Config
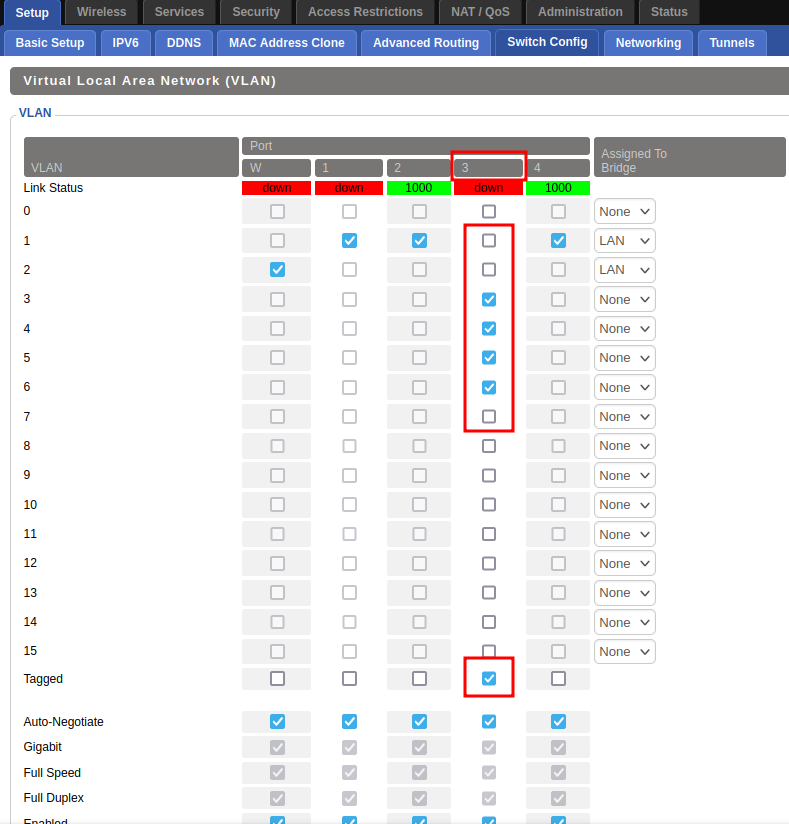
You'll want to start by going to Setup >> Switch Config. In this screen, on the port you wish to use as the trunk port from your pfSense box, do the following:
- Untick the box that is currently checked on that port (mine is VLAN 1, but your's may differ).
- Scroll down, and check the box for ‘Tagged’ for that samem port.
- Scroll back up and check the box for the VLAN numbers you've setup in pfSense (in my case I used 3,4,5 and 6).
- Save
- Apply Settings (then wait about a minute).
Wireless Setup
Now we need to move to Wireless >> Basic Setup, and do the following:
NOTE: If you have more than one radio in your router, you should follow these steps for each radio frequency you want available.
- Below the Wireless section for the radio you wish to setup, click the "Add Virtual AP" button. Click and create the number of Virtual APs you want to have different wireless networks for. ( I have 4 VLANs but only want wireless for three of them, so I clicked this button three (3) times).
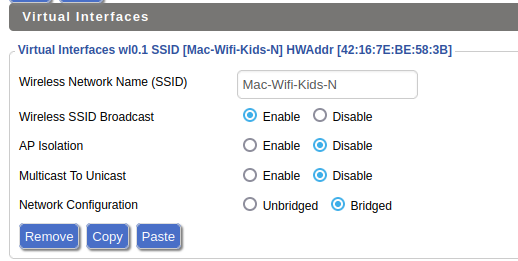
- Change the SSID name in each new Virtual AP to your desired network name.
- Set Wireless SSID Broadcast = Enabled, AP Isolation = Disabled, Multicast to Unicast = Disabled, Network Configuration = Bridged. Set this for each new Virtual AP (VAP).
- Click ‘Save’
- Click 'Apply Settings'

Again, wait a minute or two, and make sure your wireless devices can now see these new Wireless SSIDs.
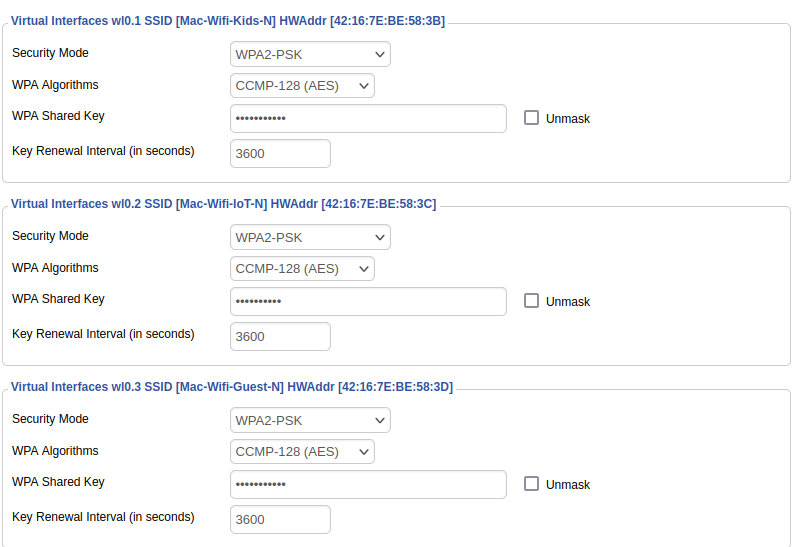
Now move to Wireless >> Wireless Security and setup the security on each Virtual AP. I highly recommend using nothing less than WPA2-PSK for your wireless security. On this, Save after setting each Wireless signal's security settings, or you'll lose the setting when you click the drop down on the next Virtual AP.
When done, click ‘Apply Settings’, and wait for a couple of minutes to allow all changes to take affect.
Creating Bridges
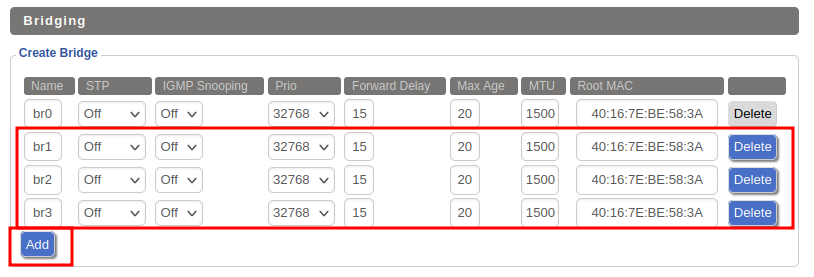
Next we need to create a bridge for each of the Virtual APs we've created. Go to Setup >> Networking.
- Under the section called “Bridging / Create Bridge” click the ‘Add’ button for the number of Virtual APs you have.
- Name the bridges in order starting with “br1”. I made three bridges, so I named them “br1”, “br2”, and “br3”.
- Save
- Apply Settings, and wait patiently as your router creates these bridges.
Connect Virtual APs to VLANs
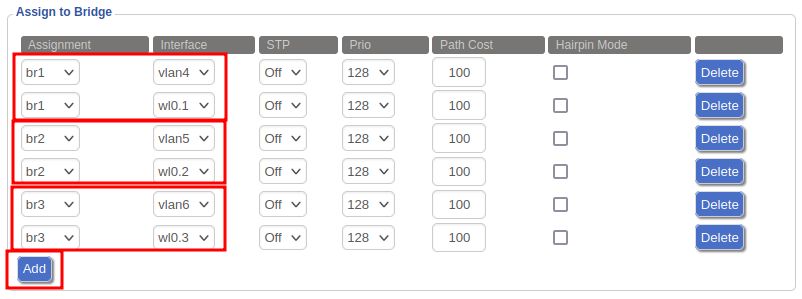
Now we need to go under the “Assign to Bridge” section, and
- click the “Add” button twice for each Virtual AP we have created. Since I created three virtual APs, I need to click the “Add” button six (6) times.
- In the “Assignment” drop-down for the first row in the “Assign to Bridge” section, select “br1”.
- Now, select your first VLAN under “Interface” in the first row. Since I used VLAN 3, 4, 5, and 6, but I only setup Virtual APs for three of my VLANs I'll select the VLANs that correspond to the same VLAN tag from my pfSense box for those VIrtual APs. (e.g. I need to select VLANs for my Kids, IoT and Guest wifi, which are tagged as 4, 5, and 6 respectively on my pfSense firewall). So, I'll select VLAN 4.
- In the next row under “Assignment” select “br1” again.
- Under “Interface” in the second row, select your Virtual AP number. On mine under the 2.4 GHz my main wireless is “wl0”, and my 3 VAPs are “wl0.1”, “wl0.2”, and “wl0.3” respectively. So I'll choose “wl0.1” here.
- Repeat this process for each bridge you made above, and assign the next VLAN to the next Virtual AP.
This process bridges the VLAN to the Virtual AP (Wifi) signal we've created.
7. Save
8. Apply Settings.
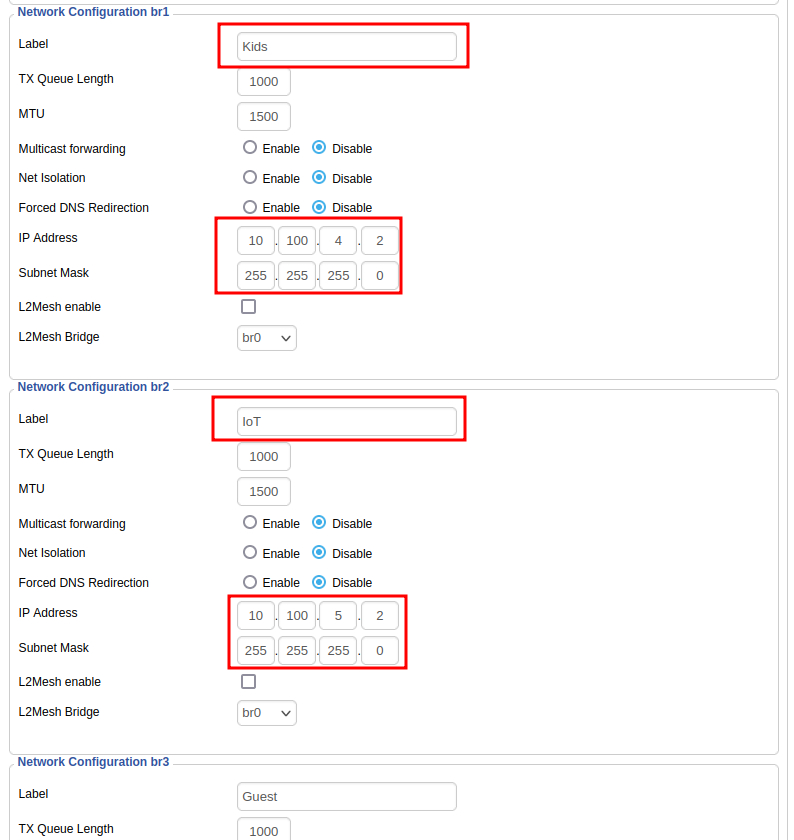
Set the Network Configuration for each Bridge
Scroll down, and fill in the Label, IP Address, and Subnet Mask for each of the Bridges. This will allow access to the DD-WRT configuration console via these VLAN networks if needed, and makes them easier to identify in the user interface.
The IP Address should be one in the same subnet as the VLAN for that bridge, but outside the DHCP Range you set in pfSense.
Click 'Save', then 'Apply Settings'.
Testing Connectivity
At this point, you should move your cable from your pfSense box, to the port where you've assigned the VLANs.
Wait for a few minutes, then make sure your wireless SSIDs are showing up as options on your PC, tablet, and or Phone. Use a device, and try to connect to one of your Virtual APs. If you connect, congratulations! You've done it!
If not, not to worry, there may be a little more to do. First, simply power off the router for about 30 seconds, then power it back on, and wait for it to start completely. Then attempt to connect to a Virtual AP one more time.
(OPTIONAL) Adding Startup Commands
If you have tried connecting, but cannot get the Virtual Wifi to connect, and you are certain you are using the right password for that interface, then you can try 1. Turning off the security briefly while troubleshooting. 2. Test again after a reboot.
If you are still unable to get connected, you may need some startup commands in the DD-WRT router in order to get the Virtual APs to work properly. My routers have a Brodcom chipset in them, and are known to be a bit fussy about working well with Virtual APs. Before trying these commands, you should 100% check the DD-WRT Wiki and Forums for information on your specific Router Make, Model, and Version.
In my case, a script that tells the router to wait for 20 seconds after it's booted, then stop services, turn off all ethernet ports, turn them back on, and start services is what made it work.
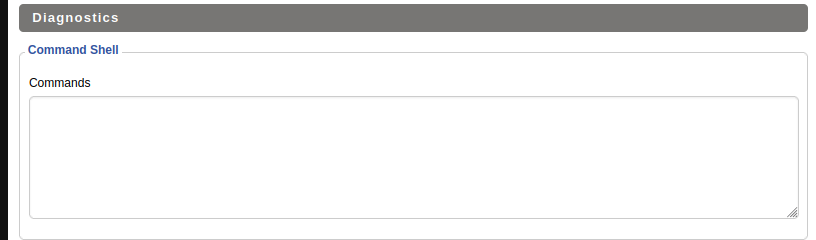
You can add a command by going to Administration >> Commands.
- Type or paste your command into the field. Double check that it is correct (at least according to any documentation you are following). My command is
sleep 20; stopservice nas; wlconf eth0 down; wlconf eth1 down; wlconf eth2 down; startservice nas; wlconf eth0 up; wlconf eth1 up; wlconf eth2 up; - Once entered, click the ‘Save Startup’ option. If you get an error when saving, you may instead click the ‘Save Firewall’ option, as it has been reported that with some router models the ‘Save Startup’ generates an error.
- Once saved, reboot the router.
- Once rebooted fully, wait another 30 seconds or so, then try again to connect.

If you are still unsuccessful, it is time to start the more in-depth troubleshooting, of verifying your setup from start to finish.
Hopefully you have gotten everything working, and are now up and running with VLANs and Virtual APs in your home or business.
Support my Channel and Content
Support my Channel and ongoing efforts through Patreon:
https://www.patreon.com/bePatron?u=234177
No comments to display
No comments to display